Last Saturday my friends and I butchered a bison. Most of the pictures are similar to the first two times we did it so I don't have anything new to say about it. My friend did capture this interesting video of me. I learned this trick from my friend Tony.
Monday, February 22, 2010


Monday, February 01, 2010
Rain Barrels
Last weekend I finished installing my rain water catchment system. The system will function as an emergency backup water source. My house runs on well water that is powered electrically. If the power goes out, I have no water. If I owned the house I would install a backup system, but as a renter it doesn't make a lot of sense. Also, I learned that if a dog should happen to rip the faucet off the outdoor spigot, I have no water pressure which makes it hard to get water. So having 220 gallons of water stored is a little insurance against water system failure.
Although it will function as a back up water reserve for household use, it will be the primary water source for my garden. This is why I located it on the uphill side of the house. With the future garden being downhill of the rain barrels, I should have enough water pressure to water the garden. The catchment system is also situated near my chicken coop and will serve as the water source for my chickens as well.
To begin I obtained four 55 gallon plastic barrels from a friend. I researched quite a bit on the internet to figure out the best way to set them up. The following links are where I got most of my ideas. The first link especially contains the technical details I needed. If you look at it, you'll see from the pictures that most of my system uses ideas found within.
water conservation pdf
skagit.wsu.edu pdf
August Home Publishing pdf
A Spouse's Guide to Building the Perfect Rain Barrel System
Each rain barrel has two bung holes on top.

The bung holes are perfect for this project because the have a built-in threading. I simply drilled out a hole in the center.

Here you can see the PVC piece threads into the bung cap perfectly. This made the project so easy because I didn't have to drill out my own holes and worry about making a water-tight seal. All it took was a little teflon tape wrapped around the threading of the PVC piece. Not using a permanent sealant also allows me to reconfigure or move the system with ease.

As you'll see in the pictures at the end of the post, the rain barrels are actually set up upside down. Therefore, I had to make an opening on the bottom of the barrel to collect water.

I added a screen over the intake to filter out debris and to keep mosquitoes out. My entomologist father warned me more than once to do this.

Below you can see the barrels set up in series. It took considerable time to get the cinder blocks level. They aren't the prettiest things to look at, but they are a cheap and effective solution. Elevating the barrels is necessary to have a place for the pipes to go, but the added benefit is that they are elevated above the garden as well.
After installing the outlet piping on barrel 1, I set up a piece of twine as a guide for installing the pipes for the other three.

The following pictures show the completed system. Rerouting the downspout was easy. I bought the elbow piece under the gutter and the plastic piece that wraps the corner and one piece to secure it to the wall. The other parts are from the original downspout.
Behind barrel 1 you'll notice a hose. I took advantage of the second bung hole on the barrel and added a pipe that terminates in a hose fitting. This hose will eventually lead to the chicken coop. I have a water dish that hooks into a hose that fills automatically using a valve triggered by the weight of the water in the dish.

There are a few special features to mention. First, in the picture below you'll notice a pipe at top between barrel 1 and barrel 2. Along with a valve under barrel 1 I can prioritize its filling. I simply shut the valve. As water fills barrel 1, it spills through the pipe into barrel 2. From there the water goes down into the pipes and fills barrels 2, 3 and 4 equally from below.
If I open the valve then all 4 barrels are filled equally. The purpose of this is to make sure the chickens always have water (which comes from barrel 1). At the end of the pipe under barrel 4 there is a faucet where I will connect a hose for watering the garden. With the valve shut, no water from barrel 1 will be used.
Barrel 4 has an overflow pipe at top with a hose fitting. I don't have a hose for this yet. I will most likely send this water to the front yard for use in the garden somehow.

One of the nicest things about this system is that I can easily add new barrels. None of the pipes are permanently in place. It rained Monday and last I checked barrel 1 was full and the others had 4-5 inches. For fun I opened the valve and watched the water level in barrel 1 go down and in the others rise. No leaks to report. It's working great!
Update 03/10/2010: After sometime I noticed that the water level in barrel 3 was not equal to barrels 2 and 4. I figured out that barrel 3 had no way to vent air. My solution was to drill a very small hole near the top to let the air out. There was so much are built up that it blew out air for a good 20 minutes straight. The barrels are all level now.
Although it will function as a back up water reserve for household use, it will be the primary water source for my garden. This is why I located it on the uphill side of the house. With the future garden being downhill of the rain barrels, I should have enough water pressure to water the garden. The catchment system is also situated near my chicken coop and will serve as the water source for my chickens as well.
To begin I obtained four 55 gallon plastic barrels from a friend. I researched quite a bit on the internet to figure out the best way to set them up. The following links are where I got most of my ideas. The first link especially contains the technical details I needed. If you look at it, you'll see from the pictures that most of my system uses ideas found within.
water conservation pdf
skagit.wsu.edu pdf
August Home Publishing pdf
A Spouse's Guide to Building the Perfect Rain Barrel System
Each rain barrel has two bung holes on top.

The bung holes are perfect for this project because the have a built-in threading. I simply drilled out a hole in the center.

Here you can see the PVC piece threads into the bung cap perfectly. This made the project so easy because I didn't have to drill out my own holes and worry about making a water-tight seal. All it took was a little teflon tape wrapped around the threading of the PVC piece. Not using a permanent sealant also allows me to reconfigure or move the system with ease.

As you'll see in the pictures at the end of the post, the rain barrels are actually set up upside down. Therefore, I had to make an opening on the bottom of the barrel to collect water.

I added a screen over the intake to filter out debris and to keep mosquitoes out. My entomologist father warned me more than once to do this.

Below you can see the barrels set up in series. It took considerable time to get the cinder blocks level. They aren't the prettiest things to look at, but they are a cheap and effective solution. Elevating the barrels is necessary to have a place for the pipes to go, but the added benefit is that they are elevated above the garden as well.
After installing the outlet piping on barrel 1, I set up a piece of twine as a guide for installing the pipes for the other three.

The following pictures show the completed system. Rerouting the downspout was easy. I bought the elbow piece under the gutter and the plastic piece that wraps the corner and one piece to secure it to the wall. The other parts are from the original downspout.
Behind barrel 1 you'll notice a hose. I took advantage of the second bung hole on the barrel and added a pipe that terminates in a hose fitting. This hose will eventually lead to the chicken coop. I have a water dish that hooks into a hose that fills automatically using a valve triggered by the weight of the water in the dish.

There are a few special features to mention. First, in the picture below you'll notice a pipe at top between barrel 1 and barrel 2. Along with a valve under barrel 1 I can prioritize its filling. I simply shut the valve. As water fills barrel 1, it spills through the pipe into barrel 2. From there the water goes down into the pipes and fills barrels 2, 3 and 4 equally from below.
If I open the valve then all 4 barrels are filled equally. The purpose of this is to make sure the chickens always have water (which comes from barrel 1). At the end of the pipe under barrel 4 there is a faucet where I will connect a hose for watering the garden. With the valve shut, no water from barrel 1 will be used.
Barrel 4 has an overflow pipe at top with a hose fitting. I don't have a hose for this yet. I will most likely send this water to the front yard for use in the garden somehow.

One of the nicest things about this system is that I can easily add new barrels. None of the pipes are permanently in place. It rained Monday and last I checked barrel 1 was full and the others had 4-5 inches. For fun I opened the valve and watched the water level in barrel 1 go down and in the others rise. No leaks to report. It's working great!
Update 03/10/2010: After sometime I noticed that the water level in barrel 3 was not equal to barrels 2 and 4. I figured out that barrel 3 had no way to vent air. My solution was to drill a very small hole near the top to let the air out. There was so much are built up that it blew out air for a good 20 minutes straight. The barrels are all level now.
Sunday, January 10, 2010
Tanning a Nutria - Part 2
If you haven't read Part 1 of this series, you can read it here. Sunday night I finished the Nutria tanning project I started at the end of November. At the end of Part 1 I set the racked nutria by the wood stove to dry. Over the course of a few nights there, it dried out. One weekend my friend Andrew and I decided to work on our hides together. He obtained an animal from the same source. His was much larger than mine as you'll see in the picture below.
I used the same metal scraper my brother and I used on the bison. It was pretty easy except the details of head. Half of the time was spent carefully scraping around the ears, eyes, nose and lips.

Andrew did an open skinning and used obsidian to scrape. He tanned it and laid it out in the sun and then never saw it again. I guess someone walking by took it.

Saturday I began the long process of tanning. I used a mixture of soap, oil and water. I rubbed it in till it started getting soft. Then I poured on more mixture and folded the trash bag over top and let it saturate for several hours. When I came back it was fully saturated and flexible.

I started a fire in the wood stove to warm the air. I popped in the new Wolverine movie and settled in for many hours of stretching and drying the hide. I wrung out as much moisture as I could. Then I pulled it back and forth over a rounded post stretching all parts of the hide. Wolverine ended. I put in Watchmen and continued. The skin changed from blue to white meaning it was getting drier. Two and half hours later when Watchmen was winding down, the hide was basically dry but still felt a little cool to the touch. I continued to work the hide as I watched The Ladies Man although it was basically done at that point. The next morning the belly was soft and flexible as can be. The back was just the slightest bit stiff. Overall I was very pleased. I think the lesson was to wring it out more and towel off the fur side before stretching.
The next day I buffed the hide with a pumice stone to soften it up and get rid of skin fragments. In the picture below the right side has been buffed.

Sunday night I got out my smoker. I used to have a pail to contain the fire and support the top pail. Without that I had to rig up this monstrosity of wood and stone to support the top pail and funnel the smoke up. The efficiency of this device was pretty pathetic. 75% of the smoke probably never reached the hide. It might be hard to tell in the picture but there was a skirt of denim sewn onto the hide and connected to the duct. Using the duct prevented the flame and heat from scorching the hide.

Here you can see that the smoke was definitely reaching the hide through the duct. I later clothes-pinned the arms and mouth shut to keep the smoke inside longer. To get smoke I built up a bed of coals and then added wet wood and live evergreen branches. I had to constantly monitor it to keep it from flaming up or burning out. After an hour and a half I took it down.

The picture below shows the finished product. The picture quality isn't that great so it's hard to tell the difference between this and the pre-buffed picture earlier. But the color is definitely darker.

I'm very happy with the finished hide. The hair stayed on and it's soft and flexible enough to make a puppet out of. There were some holes to sew up and I lost the eyelashes, but other than that it's pretty nice. The only thing left to do is make something with it. Most likely I'll sew the bottom together to make some type of bag. I'll post pictures if/when I do that.

I used the same metal scraper my brother and I used on the bison. It was pretty easy except the details of head. Half of the time was spent carefully scraping around the ears, eyes, nose and lips.

Andrew did an open skinning and used obsidian to scrape. He tanned it and laid it out in the sun and then never saw it again. I guess someone walking by took it.

Saturday I began the long process of tanning. I used a mixture of soap, oil and water. I rubbed it in till it started getting soft. Then I poured on more mixture and folded the trash bag over top and let it saturate for several hours. When I came back it was fully saturated and flexible.

I started a fire in the wood stove to warm the air. I popped in the new Wolverine movie and settled in for many hours of stretching and drying the hide. I wrung out as much moisture as I could. Then I pulled it back and forth over a rounded post stretching all parts of the hide. Wolverine ended. I put in Watchmen and continued. The skin changed from blue to white meaning it was getting drier. Two and half hours later when Watchmen was winding down, the hide was basically dry but still felt a little cool to the touch. I continued to work the hide as I watched The Ladies Man although it was basically done at that point. The next morning the belly was soft and flexible as can be. The back was just the slightest bit stiff. Overall I was very pleased. I think the lesson was to wring it out more and towel off the fur side before stretching.
The next day I buffed the hide with a pumice stone to soften it up and get rid of skin fragments. In the picture below the right side has been buffed.

Sunday night I got out my smoker. I used to have a pail to contain the fire and support the top pail. Without that I had to rig up this monstrosity of wood and stone to support the top pail and funnel the smoke up. The efficiency of this device was pretty pathetic. 75% of the smoke probably never reached the hide. It might be hard to tell in the picture but there was a skirt of denim sewn onto the hide and connected to the duct. Using the duct prevented the flame and heat from scorching the hide.

Here you can see that the smoke was definitely reaching the hide through the duct. I later clothes-pinned the arms and mouth shut to keep the smoke inside longer. To get smoke I built up a bed of coals and then added wet wood and live evergreen branches. I had to constantly monitor it to keep it from flaming up or burning out. After an hour and a half I took it down.

The picture below shows the finished product. The picture quality isn't that great so it's hard to tell the difference between this and the pre-buffed picture earlier. But the color is definitely darker.

I'm very happy with the finished hide. The hair stayed on and it's soft and flexible enough to make a puppet out of. There were some holes to sew up and I lost the eyelashes, but other than that it's pretty nice. The only thing left to do is make something with it. Most likely I'll sew the bottom together to make some type of bag. I'll post pictures if/when I do that.

Wednesday, January 06, 2010
The Chickens Are All Grows Up
I thought I would give an update on my chickens since a lot has changed in 3 months. I spent many hours patching up all the holes in the fence to keep the dog inside. Over the course of a month, it was a battle between us. He found rotted pieces of fence or low places he could jump over. He even broke out going under the house and knocking a downspout down in the process. I thought I finally had him until he decided to jump the porch fence despite the 5 foot dropl. In the end a plastic coated wire leash was the solution. Now he spends his days on the front porch where he wants to be.
I tell you this because in my failed quest to contain the dog in the backyard, I succeeded in keeping him out and the chickens in. I was finally able to let them free range. I simply open the door in the morning and close it at night. In the picture below, you can see how different the run is compared to the lawn. The run used to be as green. The lawn has since been scratched up in many places but is mostly still green. I really think the chickens are much happier now.

This picture taken a couple weeks ago shows how much bigger and healthier they are now. The reddish colored ones which I now believe to be the Sex-links breed look a lot better. Some of them had been missing a lot of feathers.

As I mentioned in my last chicken post the screen I put over my droppings pits didn't allow the droppings to fall through. I swapped it out for some plastic coated chicken wire. Despite the larger holes it is still pretty sturdy for the chickens to walk on and allows the poo to drop through. I can get away with cleaning it every two weeks though one week is better.

At some point in the late fall my chickens stopped laying eggs. I really didn't understand what the deal was. I actually had to buy a dozen eggs at the store. Then I read that egg laying is related to sunlight and that a light in the coop would help. I installed a 60 watt bulb on a timer to give the chickens solid light from 5am to 7pm. After a few days, they started laying again.
In December we had a week of temperatures in the teens. I felt pretty bad for the hens. I put towels over the openings under the roof and the door to prevent drafts and keep the body heat in. At night I put coals from my wood stove in between two metal pans and put them in the coop to add some heat. The water froze every day so I put out a pan every morning. I'm glad the birds were all bigger and fully feathered. They made it through the week with now problem.
Over the course of the last month the egg production has steadily increased. I started noticing some really small eggs mixed in with the normal eggs. I figured out that the small ones were the first eggs of one of the hens. As of this week I'm up to 6-7 eggs a day including the small ones. I expect over the course of the next month the tiny eggs will be replaced by normal sized ones. Below is a picture of the spectrum of egg sizes, shapes and colors they are laying right now. They range from "just bigger than a quarter" to "can't close the carton, jumbo sized".

While the one on the left is pretty darn small, the one on the right is dog gone big too!

The next big project that I'm working on is hooking up rain barrels to harvest rainfall from my roof. As part of that project I plan to hook up a new chicken water dish that will be fed from the rain barrels. If it works like I plan, watering the chickens will be one less task for me to worry about.
I tell you this because in my failed quest to contain the dog in the backyard, I succeeded in keeping him out and the chickens in. I was finally able to let them free range. I simply open the door in the morning and close it at night. In the picture below, you can see how different the run is compared to the lawn. The run used to be as green. The lawn has since been scratched up in many places but is mostly still green. I really think the chickens are much happier now.

This picture taken a couple weeks ago shows how much bigger and healthier they are now. The reddish colored ones which I now believe to be the Sex-links breed look a lot better. Some of them had been missing a lot of feathers.

As I mentioned in my last chicken post the screen I put over my droppings pits didn't allow the droppings to fall through. I swapped it out for some plastic coated chicken wire. Despite the larger holes it is still pretty sturdy for the chickens to walk on and allows the poo to drop through. I can get away with cleaning it every two weeks though one week is better.

At some point in the late fall my chickens stopped laying eggs. I really didn't understand what the deal was. I actually had to buy a dozen eggs at the store. Then I read that egg laying is related to sunlight and that a light in the coop would help. I installed a 60 watt bulb on a timer to give the chickens solid light from 5am to 7pm. After a few days, they started laying again.
In December we had a week of temperatures in the teens. I felt pretty bad for the hens. I put towels over the openings under the roof and the door to prevent drafts and keep the body heat in. At night I put coals from my wood stove in between two metal pans and put them in the coop to add some heat. The water froze every day so I put out a pan every morning. I'm glad the birds were all bigger and fully feathered. They made it through the week with now problem.
Over the course of the last month the egg production has steadily increased. I started noticing some really small eggs mixed in with the normal eggs. I figured out that the small ones were the first eggs of one of the hens. As of this week I'm up to 6-7 eggs a day including the small ones. I expect over the course of the next month the tiny eggs will be replaced by normal sized ones. Below is a picture of the spectrum of egg sizes, shapes and colors they are laying right now. They range from "just bigger than a quarter" to "can't close the carton, jumbo sized".

While the one on the left is pretty darn small, the one on the right is dog gone big too!

The next big project that I'm working on is hooking up rain barrels to harvest rainfall from my roof. As part of that project I plan to hook up a new chicken water dish that will be fed from the rain barrels. If it works like I plan, watering the chickens will be one less task for me to worry about.
Sunday, November 22, 2009
Tanning a Nutria - Part 1
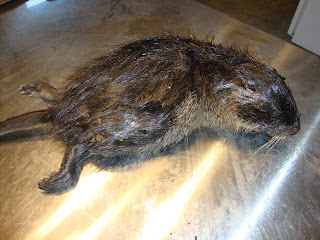
My brother came over today and brought me a gift. A dead nutria. I've wanted to tan one for awhile. My first introduction to the nutria was when my SCA crew bought a tanned hide and sewed it into a pouch as a gift for our crew leader. She loves soft, cuddly animals.
Since moving to the Portland area, I've been able to see them alive in the wild. There are at least three that I see from time to time at work. I've often mentally hunted and trapped them. They are pretty trusting around humans. The Trackers Northwest group sometimes teaches classes where they trap Nutria so I've seen hides in the tanning process. In fact, I'm told this Nutria came by way of TrackersNW.
I laid it out on the stainless steel table my brother and I bought a year ago with butchering animals in mind. No worries with blood and guts soaking into wood. It also is a high table so it's comfortable to stand around when working. It's worked for bison, deer and now nutria. I digress.
The body wasn't stiff so that made it easy to work with. The smell was only mild. Not bad.
With the bison we cut a line down the center of the belly, cuffed the legs and the neck. With the nutria I "case" skinned it instead. I still cuffed the legs, but the only other cut was around the anus (and later the tail) and connecting that to the back leg cuffs as seen in the picture below. I used two flakes of obsidian for all the cutting. One flake is at the bottom right corner of the picture.

Once I got started it was relatively easy to pull the skin over the animal until I got to the head. The head took a lot of time because of the eyes, ears and mouth. The plan is to tan the full hide including the head. In the picture below you can see the skin rolled right over the animal and is hanging on only by the tail. I ended up cutting the tail skin off completely because it didn't want to come off the body.

The last step was to fashion a stretching board. I used an old shelf and shaped it to fit the animal. Now I will let it dry out. The next step after drying will be to scrape all the meat, skin and other parts off. Sitting by the wood stove this guy should dry out faster than the bison.

I decided that I wasn't going to eat the meat because I didn't know how long it had been dead and exactly where it came from. My brother wanted to keep the bones though so I did get some practice gutting. It was a piece of cake compared to a bison.
Read Part 2 here.
Since moving to the Portland area, I've been able to see them alive in the wild. There are at least three that I see from time to time at work. I've often mentally hunted and trapped them. They are pretty trusting around humans. The Trackers Northwest group sometimes teaches classes where they trap Nutria so I've seen hides in the tanning process. In fact, I'm told this Nutria came by way of TrackersNW.
I laid it out on the stainless steel table my brother and I bought a year ago with butchering animals in mind. No worries with blood and guts soaking into wood. It also is a high table so it's comfortable to stand around when working. It's worked for bison, deer and now nutria. I digress.
The body wasn't stiff so that made it easy to work with. The smell was only mild. Not bad.

With the bison we cut a line down the center of the belly, cuffed the legs and the neck. With the nutria I "case" skinned it instead. I still cuffed the legs, but the only other cut was around the anus (and later the tail) and connecting that to the back leg cuffs as seen in the picture below. I used two flakes of obsidian for all the cutting. One flake is at the bottom right corner of the picture.

Once I got started it was relatively easy to pull the skin over the animal until I got to the head. The head took a lot of time because of the eyes, ears and mouth. The plan is to tan the full hide including the head. In the picture below you can see the skin rolled right over the animal and is hanging on only by the tail. I ended up cutting the tail skin off completely because it didn't want to come off the body.

The last step was to fashion a stretching board. I used an old shelf and shaped it to fit the animal. Now I will let it dry out. The next step after drying will be to scrape all the meat, skin and other parts off. Sitting by the wood stove this guy should dry out faster than the bison.

I decided that I wasn't going to eat the meat because I didn't know how long it had been dead and exactly where it came from. My brother wanted to keep the bones though so I did get some practice gutting. It was a piece of cake compared to a bison.
Read Part 2 here.
Subscribe to:
Posts (Atom)

