Showing posts with label pitch. Show all posts

Tuesday, September 30, 2008

Glass Buttes 2

My brother and I drove back to Glass Buttes a couple weekends ago. This time we decided to drive around and map out the area so we knew where different varieties of obsidian were. We stopped at a campground and found this gigantic pile of debitage. 


When walking around one area I stumbled upon a small quarry with exposed rock. You can never tell how big a rock you have until you pull it out. We pulled a few nice size rocks out and then started excavating a huge one.


It turned out being the tip of an iceberg. We were a little bummed about not unearthing the entire thing.


Then my brother decided to spall it while it was in the ground and ended up with the biggest spalls I've ever seen.
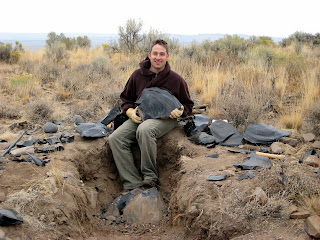

We loaded my car up with over 400 pounds of rock and drove home. Now we have a room dedicated to storing our rocks. We plan to get some shelves to store it eventually.
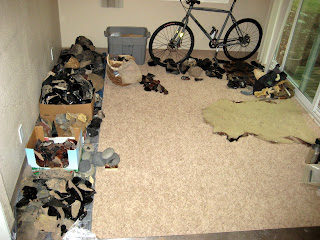

Here are a few of the pieces I've been working on the past month. Only the small point at the bottom left and the knife have been pressure flaked (sharpened). I plan to work the rest into more refined products eventually. Most likely they will be spear points.


Here is a close up of the knife. The handle is made from Redheart wood.
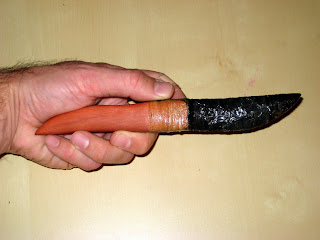

I hafted the blade into the handle using pitch made from sap and charcoal. I then wrapped it with deer sinew dipped in deer hide glue.

Thursday, April 17, 2008

Obisidan Knife

I've wanted to make a knife or spear point for a long time. Until a couple days ago I never made a point longer than a few inches. The first problem was to get a long enough piece of rock to work with. I started by knocking a long thin spall off a roundish nodule. From there I knocked piece after piece off making very few mistakes for once. I took a few pictures on the way to the finished product because I was afraid I would mess it up.

I switched to pressure flaking a little sooner than I should have. I could control the accuracy of the flakes I pushed off so much easier than when striking the rock. The problem is that the flakes I took off weren't as long and thick as when striking. I was too afraid to ruin the piece with a misplaced strike though so I picked up the ishi stick. The consequence was a thicker, duller blade than I hoped for. Near the tip it's probably a 2/1 or 3/1 width to thickness ratio. That makes it good for stabbing things but not so good for slicing. By the way, I don't plan to do either with this guy so don't worry. The finished point ended up being about 4 1/2 inches long.


After finishing the point, I selected an antler from my stash. I sawed of the tines at a nice wide spot. I put the antler in boiling water to soften up the inside of the antler. After taking it out it was pretty easy to scrape out the inside with some metal tools. I also filed down a groove in the sides since the rock was wider than the antler. When fitted together the blade fit about 1 1/4 inches into the antler handle. Ideally it would've been a little deeper into the handle, but I was satisfied with it.


After whipping up a batch of pitch as I discussed in my last post, I poured it into the antler handle. At the same time I heated up the blade over the Jesus candle so that the knife would have holy powers. I then jammed the blade into the handle.

As the pitch overflowed I molded it around all sides of the blade and handle. As the pitch cooled it became very easy to mold. Below is a close up of the finished product showing the black pitch.


The picture below shows you the overall size of the knife. The blade is now approximately 3 inches long. The blade feels very secure inside the handle.

Pitch - "Survival Epoxy"

Last November when doing trail work in the lower Sierra Nevada's I happened upon a tree that was gushing out sap. The picture below shows just a portion of the sap that was running. I took the opportunity to collect as much as I could. After finishing with this tree I found a few more trees that had pretty good quantities. I suspect the dry air in the region leads to more limbs cracking then most places.


I collected the sap to make pitch which can be used for many projects. Anytime you need to adhere one object to another, pitch can be used. I hadn't had a need for it until today when I hafted an obsidian blade into a deer antler handle. That will be the topic of my next post. To make pitch you mix equal parts sap and a hardening agent. Charcoal, white ash and powdered egg or mollusk shells are examples of hardening agents. I chose to use charcoal from the remains of my pottery fire.

First I rigged up a contraption to melt down the sap. The bottom of a beverage can rests on two wood blocks sitting over a candle. I put tape on the wood so the can wouldn't slip around. The small candle provided plenty of heat to soften up the sap.


Next I added a small amount of hard sap to the can.


After a few minutes it melted into a viscous liquid. I pulled out as much debris as I could to make it more pure. The more junk in there the more crumbly the final product will be.


Meanwhile I used a nice ergonomic grinding stone I found on another trip to powder up charcoal.


Then I mixed an equal amount of charcoal powder into the liquid sap.


Finally, after using it on my obsidian knife which I'll discuss in my next post, I took the remaining pitch and molded it on a stick for later use. All that needs to be done next time is to hold the pitch stick over a flame for a second to turn it to liquid.