Sunday, November 02, 2008

Felted Hat

Last week my brother and I experimented with the art of felting. We started by buying bundles of wool fibers from a store in the area. Most of the wool was of different sheep varieties but we also choose llama wool because of the nice brown color and cheaper price. There were many colors to choose from but we choose earth tones for making camouflage gear. We bought a total of 28 ounces of wool for about $40.

We took some of the white wool and dyed it using black walnut husks and osage orange saw dust. 


Pictured below are the wool fibers after dying. The yellows are from the osage orange dye. The orange and brown are from the black walnut dye. We were hoping that these would come out black and I'm not sure why one batch was orange and the other brown.


We decided to make hats. We referenced four different felting books from the local library. Each had a slightly different technique for felting a hat. The main concept was to pat, press, rub, agitate, massage, knead and throw the wool until it was felted. An important point was that the wool shrinks about 40% as from start to finish. Therefore we had to start with a hat 40% bigger than our head.

Below you can see one half of my hat laid out. Notice how it was 40% bigger than my head.


After laying out the wool I poured warm soapy water on it and pressed it down to tangle the wool fibers, starting the felting process. I left a 2 inch fringe of fibers dry so I could splice the matching hat piece to it.


Here you can see my hat with both pieces spliced together on the left and my brother starting his hat on the right.


After more rubbing and pressing the hat became felted enough that I could pick it up. Notice it is still very large.


After more kneading and throwing it hard against the table several times, the hat shrank quite a bit and I was reading to put it on my mold. We both constructed head molds from foam insulation prior to starting the hats. Once on the mold I pushed the fibers together more to shrink the hat to the desired size.


The final product is a totally customized, stitchless, wool hat. Because I made it myself, the camo pattern is exactly what I wanted and it fits my head perfectly. It took at most 6 ounces of wool to make putting the cost at around $8.


After successfully completing my first hat, I decided to challenge myself further. I made a reversible hat with a striped pattern. The first challenge was to get the stripes to line up at the splice line. The second challenge was to make the reverse side have different colors. Lining up the stripes at the splice line on the reverse side at the same time was very difficult. The splicing didn't work out so great on one part and I had to stitch it up.


Here is the same hat inside out (reversed).


On the list of future projects are quivers, bow socks, mittens, socks, boots, and perhaps other clothes. My dream project is to make a stitchless hooded sweatshirt, but the splicing would be very hard, not to mention making matching sleeves.

Tuesday, September 30, 2008

Glass Buttes 2

My brother and I drove back to Glass Buttes a couple weekends ago. This time we decided to drive around and map out the area so we knew where different varieties of obsidian were. We stopped at a campground and found this gigantic pile of debitage. 


When walking around one area I stumbled upon a small quarry with exposed rock. You can never tell how big a rock you have until you pull it out. We pulled a few nice size rocks out and then started excavating a huge one.


It turned out being the tip of an iceberg. We were a little bummed about not unearthing the entire thing.


Then my brother decided to spall it while it was in the ground and ended up with the biggest spalls I've ever seen.


We loaded my car up with over 400 pounds of rock and drove home. Now we have a room dedicated to storing our rocks. We plan to get some shelves to store it eventually.


Here are a few of the pieces I've been working on the past month. Only the small point at the bottom left and the knife have been pressure flaked (sharpened). I plan to work the rest into more refined products eventually. Most likely they will be spear points.


Here is a close up of the knife. The handle is made from Redheart wood.


I hafted the blade into the handle using pitch made from sap and charcoal. I then wrapped it with deer sinew dipped in deer hide glue.

Saturday, September 06, 2008

Glass Buttes

August 20th I drove from Portland to southeastern Oregon about an hour east of Bend. I met my brother and his two friends at Glass Buttes, a mountainous area composed partially of obsidian. They were nearing the end of their road trip from Washington, D.C.. We met there to get our hands on beautiful, free obsidian straight from the source. We were used to paying $1-$3 per pound for the stuff and there it was free and plentiful.

The first night we set up camp and then drove to the closest spot on our map to try to quarry some rock before dark. With pick and shovel we dug in existing pits and the progress was slow. Matt took a hike to reconnoiter some other sites. He discovered that it wasn't necessary to dig to get good stuff. There were places where cantaloupe size rocks were just laying about.

The next morning we drove to one of these sites. On top of a hill there was an open quarry filled with large chunks of Silver Sheen obsidian that had been left by previous diggers. We spent most of the morning and afternoon sitting around the quarry working the rock into smaller pieces. We were determined to take as much rock home with us as our cars could handle.

Matt reducing a rock into a biface at the quarry.


Here I was reducing a large piece with a view of the high desert in the background.


My brother Andrew dug into the wall of the quarry and pulled out several huge pieces, some weighing 50 pounds or more.


Here I was holding one of the large rocks.


Prior to the trip I had worked on maybe five rocks of the large size that was commonplace there. I was always nervous because I had paid money for the rocks and only had a few of them. At Glass Buttes there was absolutely no pressure. If I messed up I could just pick up another rock for free. That state of mind along with advice from Matt and Andrew and the hours of practice there improved my skills considerably.

Later in the afternoon Matt and I drove around the area looking for other types of obsidian. There are many names used to describe the different coloration in the obsidian so it was hard to tell exactly what we found. Based on the pictures on the www.neolitics.com we found Tiger Stripe, Brown, Midnight Lace, Mahogany and Black. The bulk of what we gathered was glossy black and opaque black which some call "Black Butter" because of how nicely and easily it flakes.

Before we left on the the third day, we gathered everything together to get a group shot. From left to right (Andrew, Me, Ryan, Matt)


In my next post I'll show pictures of some of the pieces I've made since that trip.

Portland, My Home

A lot has happened since my last post. Most importantly I moved from Riverside, California to Portland, Oregon. I wanted to move here for many years. There are so many reasons for me to live here. I could list a hundred reasons, but here are a few.

It is commonplace for people here to enjoy and appreciate nature and being outdoors. It's not hard to see why, living in between Mt. Hood and the Atlantic. Not to mention that it seems like no matter where you are there is a park within walking distance. Forest Park in NW Portland is the largest urban park in the country.

More importantly there are people here who practice primitive skills and there is even a school to teach skills. I've wanted people to practice skills with on a regular basis for a long time and now I will have them. Plus, my brother moved here too and we now live together so we can practice skills together anytime.

Portland is a good place to be for the short and long term problems this country and the world face. The city government already started planning for the inevitability of Peak Oil despite no leadership at the national level. The city has pretty good public transportation and is bike friendly. I believe the copious amount of precipitation that sours some visitors experience will be a blessing as aquifers in the country start to dry up. Another interesting thing is that it seems like every house has a garden or a fruit tree. Blackberry bushes are so dominating here that they have to be sprayed to control them.

Portland and the surrounding cities have many companies with work in my areas of expertise. Having said that I'm still unemployed and looking. I feel like this is a good place to be looking though compared with other areas of the country.

Friday, July 11, 2008

Survival Kits

What would you do if you were given 1 day/1 hour/1 minute to gather everything you needed to survive for 1 day/1 week/1 month? You would probably panic and scramble around the house looking for supplies. Chances are you would grab some non-essentials and forget to grab some necessities. Now what would you do if you were at work, the same situation happened and you couldn't get home? Would you even be able to find necessities there?

These are the questions that survival kits, a.k.a. "Grab N Go" bags or "Bug Out Bags" are meant to answer. The idea is to have everything you will need already packed up so you can literally grab it and go. It is recommended to have a kit at home, work and in your car since you never know where you'll be when you need to bug out.

Each kit should contain items to satisfy these basic needs:

  • shelter
  • water
  • fire
  • food
  • signaling or navigating for help
It is a good idea to have more than one item for each of these areas. For example, my kits have more than one way to start a fire. The smaller the kit the more important it is for an item to be useful for more than need. Also, it is essential to have a pocket knife in conjunction with the kit. I carry one in my pocket every day.

One of the benefits of making your own kit is that you can tailor it to your personal needs and skills. I, for example, have little experience fishing so I added more fishing gear than a more experienced person would need including a cheat sheet on tying fishing knots.

I don't ever plan to stake my life on these kits alone. In fact, I wouldn't feel confident in survival at all if I hadn't taken classes and practiced skills. In a long-term survival situation I see these kits as giving me a buffer period to make up for my lack of skill and experience. For example, I could make a fish hook from a piece of bone or wood, but I've never done that before so bringing fish hooks gives me time to learn how.

I decided to make three kits of different sizes. The first one is small enough to fit in my pocket so in theory I could take it with me always. It fits into an Altoids container. It's amazing how many useful things one can pack into such a small container.


Starting from the top left here are the contents and their possible uses:

  • Altoids tin: boil water/cook, plate/cup, use the metal for tools (scraper, arrowhead, etc.), signal
  • knot cheat sheet: tinder, leave a note
  • Ziploc bag: keep other items dry, hold almost a quart of water for use with purification tablets
  • fishing tackle (various sizes of hooks, swivels and split shot): stored in the little tube with the red top.
  • needles (also included in the tube): clothing repairs, medical
  • razor blades (also included in the tube); medical, process game
  • circular mirror: signal, medical (find ticks and see wounds), personal hygiene
  • compass: navigation
  • saw blade: shelter, make wooden tools (ie: trap parts, arrow notches)
  • 1 sq ft aluminum foil: cook food, boil water, fish/hunt/trap lure, signal, etc.
  • 8 water purification tablets (enough for 2 gallons): make water drinkable
  • fishing line wrapped in duct tape: fishing line to fish, clothing repairs, snare/trap parts; duct tape to repair, medical (wound closure)
  • LED light (12 hrs): temporary convenient light source, signal
  • safety pin wrapped in nylon: safety pin to repair, fish; nylon to fish, clothing repairs, shelter, snare/trap parts
  • candle (cut to fit): fire, light, heat
  • lint and petroleum jelly (in small bag): tinder (starts from a spark and when wet)
  • waterproof matches (in latex): fire
  • fire steel: fire (scrape off ignited metal filings)
  • alcohol swab: medical, fire
  • 2 butterfly closures: medical
  • bandage: medical
  • 10 ft of paracord (not pictured above): shelter, fishing line, trap/snare parts, keep kit closed, etc.

Everything packed in the kit


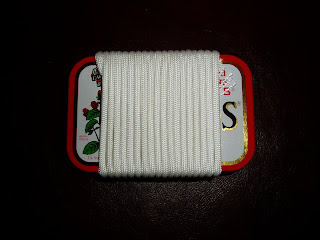
Paracord is very strong and is composed of an outer sheath with 6-7 smaller threads inside. It can be used whole or broken down into smaller pieces and is thus very versatile and useful.

The kit sealed with 10 ft. of paracord.


The second kit I made fits into a bag the size of a small camera case. The bag actually was a survival kit I bought from REI. Most of the stuff in it was junk, but the size of the bag was perfect and it had enough good stuff inside to make it worth the price. It is easy to sling over the shoulder or string through a belt. It weighs 2-2.5 pounds fully packed.

Starting from the top left here are the contents and their possible uses (where not already explained in pocket kit):

  • red poncho: clothing, shelter, water collection, signaling
  • 1 gallon Ziploc: water storage
  • emergency blanket: shelter, water collection, signaling
  • carrying bag with 25 ft. paracord strap
  • square mirror
  • money (I plan to put actual cash in when I can afford to): phone call, etc.
  • orange whistle: signal
  • 2 sq ft aluminum foil
  • LED flashlight - the only flashlight I could find that combined the long-lasting LED bulb with the cost-efficient AA battery.
  • 2 spare AA batteries
  • needle tweezers: medical (tick, splinter removal)
  • moleskin: medical (blister care, wound closure)
  • length of nylon
  • length of fishing line
  • 4 water purification tablets
  • 1 oz bottle of bleach wrapped with 2 ft of duct tape: water purification (6-8 drops/gal)
  • candle
  • camera film tube of lint and petroleum jelly
  • fire steel (from http://www.survivaltopics.com/): bigger than the one in the pocket kit
  • waterproof matches in latex: more than in pocket kit
  • 2 needles
  • 2 butterfly closures
  • 1 Pepto Bismal tablet: duh!
  • 4 500 mg acetaminophen: medical
  • 2 bandages
  • 2 alcohol swabs
  • fishing tackle: more than in pocket kit
  • 2 saw blades: the bigger one has a sharpened edge opposite the teeth for scraping wood
  • 2 bullion cubes: food (replace salts, flavoring)
  • fishing knots cheat sheet
  • Ziploc to hold small items
  • 2 razor blades
  • 5 safety pins

Below you can see the case fully packed with the strap I made from the 25 feet of paracord. It is stronger than the strap that came with the bag and is more useful.


The third kit I'm still working on fits into a backpack. It basically includes everything included in the kits above but in larger quantities. It also contains the usual gear for a backpacking trip like a tent, clothing, stove, pots, knife, food, water and sleeping bag. I also plan to include a wild edible/medicinal plant book, my survival journal, passport, cash, work gloves, etc.


I was curious to see how well aluminum foil would work for boiling water. I took a 1 sq ft sheet and formed a crude bowl. I made a fire in my rocket stove and set the foil bowl on top. It successfully boiled water. The first time I tried it I wasn't careful enough with the foil. I ended up putting holes in it with the bending and shaping, so you do have to be a little delicate with it. But, I only needed one ply to be successful.