Sunday, February 25, 2007

Snow Goggles

In one of Tom Brown Jr.'s books, I believe it was "The Tracker", he told a story of the time he had snow blindness. He was out tracking all day in the snow. By night fall he was snow blind. He built a shelter and had to crawl around to get fire wood to stay alive. Luckily he was alright the next morning.

The heavy snow we had in Indiana a week ago led me to pick up one of the projects I had stopped working on last year. Below are pictures of the snow goggles I made. They are the primitive version of sunglasses. These work by restricting the amount of sunlight that hits your eye. The slits block light reflecting off snow on the ground and clouds above. In the bottom picture you can kind of see how far my eyes are set back from the slits when wearing these.


The wood is cedar and they are very light weight. I tried them out when the sun was shining and with them on I was able to stop squinting. These are more of a long-term set. In a short term situation you could just use a strip of bark with holes poked in it.

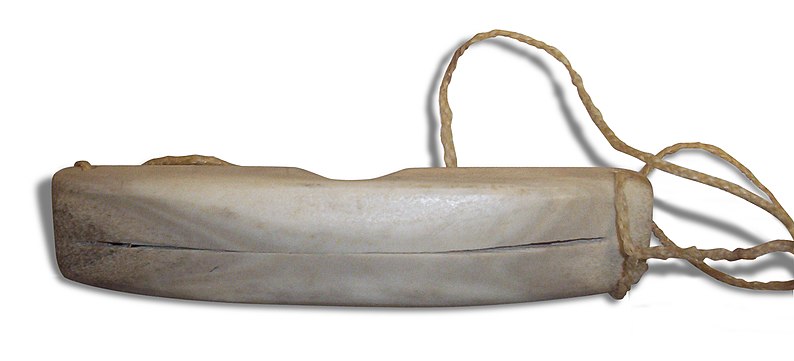
Below are traditional Inuit snow goggles made from caribou antler. You can see that the slits are infinitesimally smaller than mine. I bet mine are lighter weight though.


Picture taken from the snow blindness entry at Wikipedia.org.

Sunday, February 18, 2007

Winter Reading

It's been awhile since my last post, but I assure you I haven't been totally slacking off. I've been spending the last few weeks reading. One day during lunch I went to Half Price Books. The selection wasn't the greatest but since the books were so cheap I didn't mind buying anything that looked reasonably interesting. I ended up with eight books for $50 including one ("The Paleo Diet") that I was considering buying new online.

"The Paleo Diet" is a very interesting book (and diet). The theory is that for millions of years humans have evolved eating a diet of lean meats, fruits, vegetables and nuts and seeds and only in the last 10,000 years has man taken to eating grains, dairy food and large quantities saturated fats. The author claims that the Paleo Diet is healthier because our bodies have evolved based on that diet.

I'd like to try this diet but I first need to eat up all the cereal food I have stored up. I've also been thinking about storing food for a survival situation. I figure I would start with two weeks worth and work my way up to a couple months. But, I don't know how well that would work with the Paleo Diet. The two ideas are not exactly complimentary. The Paleo Diet doesn't allow for cereals which are the basis of every survival food storage program I've read about. It also avoids canned foods that have preservatives and salt added. I think that leaves dehydrating the food, but I don't think all fruits and vegetables will dehydrate well. I need to figure out the best way to store food for the Paleo Diet.

Another interesting book I read is "Tappan On Survival". This book is written by Mel Tappan who wrote a lot of articles for "Guns & Ammo" and "Soldier of Fortune" magazines. The book is basically all his articles compiled into book form. It was published in 1981 during the Cold War and a few years after the oil crisis. So based on these points it is easy to see why half of the book is dedicated to firearms even though it is his fifth priority in a survival situation.

The book laid out his plan for a post-apocalyptic survival scenario. The approach was a mix of what I think of as the stereotypical gun toting survivalist and a hunter gatherer. On the one hand he relies on guns for hunting and pest control, but on the other he talks about gathering wild food and caretaking his plot of land to survive off of it. I read the book with an open mind and took what I could from it.

He argued for living in a small town as the best way to survive a civilization crash. The small town would be small enough to bond together in defense against looters, share food and have medical care.

It was definitely insightful reading about different guns and there advantages and disadvantages in a survival situation. Even if I never buy one, I at least know more about them. All in all it was a good book for the four dollars I spent on it.

Finally, I've been reading a lot more about the "Peak Oil" situation. If you are interested in knowing more I suggest reading the main page on this site: http://lifeaftertheoilcrash.net/Index.html.

Sunday, January 28, 2007

Mini Bow

I finally finished my short bow. I initially started it about 4 years ago when my brother was just getting into bow making. He gave me a 38 inch stave to work on. I eventually got tired of working on it, but a couple months ago I decided to pick it up again.

Being so short, the bow can't withstand the same bending as a long bow. So the furthest I draw it is about 17 inches, well short of my 30 inch draw length. To help with the stability of the bow I made the limbs 1/2 inch wider than I would a long bow. I also didn't taper them till the last four inches. In the picture below you can see the limb width and the camo pattern I stained on it.


Over a year ago in my second bow making post, I said I was going to write about tillering. The bow I was working on at the time blew up so I didn't end up writing about it. This time I took a few pictures to show tillering. I didn't do a very good job tillering this bow. Ideally, the bend in each limb is even throughout and the two limbs match. As you can see below, when I first finished my bow, the limbs were not even. The limb on the right bends pretty evenly throughout, but the one on the left bends a lot more in the middle of the limb between numbers 3-6 on the wall.


Once I realized this, I went back and removed more wood from the right limb. The basic idea of tillering is to remove wood where the bow bends less and leave wood where it bends more. The picture below shows my final tillering. The limbs bend the same amount here, but they don't bend evenly throughout, so I only got it half right.


The bow pulls 47 lbs. at 17 inches. I wood burned this into the belly so I wouldn't forget.


To give you an idea of just how small this thing is, I put it next to my long bow. I also put my arrows for comparison. The short one is 20 inches. I'll have to play around to see what the best length will be. I took a few practice shots and the arrow fired higher than I expected. I think it is because when resting on my hand it is off center of the bow. By this I mean closer to the top tip than the bottom tip. This is the same with any bow, but with a shorter bow, being off center a couple inches makes a bigger difference.


Although this bow pulls 47 lbs., I'm not sure what the actual arrow speed is since it only pulls to 17 inches. I'll have to play around with it to see how it compares to my long bow. It should be noticeably slower since the string has so much less distance to travel.

Monday, January 22, 2007

Practice Traps

I've been terribly busy at work the last couple weeks. To add to that are the numerous sporting events I've participated in or watched on tv lately. I went a couple straight weeks without working on skills which sucks. During that time I did spend a lot of lunch time and free time reading about the peak oil crisis though. In short, I'm glad I'm practicing survival skills. The last week I have spent a good amount of time working on my snap bow. I'm in the final tillering stage and hope to have a post up about it this week.

In the mean time, I thought I'd post some pictures I found while prepping my tillering pictures. Here are a couple practice traps I set up last year. Trapping and snaring is a skill I have practiced very little and need to work on more. I think it is one of the most important skills to have in a survival situation because it is a reasonably easy and efficient way to get food.

Keep in mind that these traps were for me to practice selecting the right size sticks, cutting the right notches and figuring out the mechanics of setting them up. The weight of the dead fall portion is probably not perfect.

Figure four deadfall trap - One adjustment I'd probably make to simplify this one is to use a "Y" branching stick for the upright instead of having to carve out the notch in the diagonal stick.


Piaute deadfall trap - Typically the bait stick is propped against the bottom of the deadfall, but I couldn't get it to stay there so I propped it against the ground. With a longer string you can lower the deadfall so the quarry has less time to escape when the trigger is pulled.

Tuesday, January 02, 2007

Holiday Time

I had a great holiday with my family despite catching a cold. I ended my 2-year streak without sickness. :( My brother and I took our niece and nephew out shooting one day. He made a kid's bow a couple years ago that they both shared. It was pretty cool teaching them the proper technique.


Madeline picked it up pretty well and was able to shoot a couple arrows 30+ yards which is probably close to the bow's max range.


On our little journey we took them by a patch of cattails. Over Thanksgiving we took our nieces Natasha and Brianna by the same spot. The game is to grab the sausage head of the cattail and throw it at someone. The closer you are the better because it explodes into a cloud of fluffy seeds once you release it. By the time we were done, we had seeds all over our clothes. It's also a good way to reseed the area.


A few days after Christmas we went out shooting again. This time we took some of our friends. We had both a long and short distance shoot. The short distance shoot is pretty fun. The idea is to shoot at full draw straight up and see how close to you you can land the arrow. Part of the fun is that it is dangerous and stupid to do, but we've never had an arrow land closer than 15 yards so we're not too worried about it. As long as you keep your eye on the arrow, you're safe.

Here is my friend Steve shooting with my roommate Derik looking on.


My brother got me a Nicholson rasp for Christmas. He made the beautiful handle himself out of Osage. It's a little crooked, but it doesn't affect the performance negatively. This rasp is many times better than the one I was using before. I've been using it on the new bow I've been working on which I'll be writing about soon.


He also gave me two deer hides to tan. This is great because I've never tanned a hide before and have been wanting to learn for a long time. Chances are I won't get to them till the Spring when it is nice out, but you never know with global warming it may be nice out all winter.

I'd also like to acknowledge that I've been blogging now for over a year. I'm happy I started documenting my projects. I hope to keep it up as I delve into more skills.