It's been a busy few weeks at work. My team released our new website and it took a lot of work to get it done on schedule. I was in the mode where if I wasn't working, I was thinking about work. The launch was very successful. During the final stretch, I promised myself I would spend at least one day by myself in the woods.
Saturday I had my brother drop me off on the SW side of Forest Park around 2:30pm. I had a school sized back pack with my sleeping bag, my medium sized (camera case) survival kit, rain jacket, felt hat, a nalgene and a snapple bottle of water, my knife, a headlamp and a relatively small amount of food. The food consisted of a bagel (no cream cheese), about three dehydrated apples in chip form, about 12 ounces of beef jerky and a Hershey's bar. I also had other non-survival stuff including my phone, iPod, keys, wallet and a book. I didn't have a tent, cooking gear, change of clothes, tooth brush, etc..
The place I was dropped off was not an entrance to the park. It was just the side of a road. Luckily it was on the uphill side of the park so my journey was mostly downhill. I bushwhacked through the forest for about two hours. Along the way I came close to a few houses and tried to stay out of sight. I'm not entirely sure I was inside the park the whole time. I tried to follow deer trails as much as possible to make the hike easier. Finally as I made my way down a ridge I spotted the Wildwood Trail, a 30 mile trail spanning the length of Forest Park and into Washington Park.
At this point it was about an hour and half till dark so I prepared a shelter a ways back up the hill out of site from the trail. I found two Douglas Fir trees that were about my arm span apart. I was a little concerned about rain, so I decided to sleep between the trees so I had some canopy cover. I cleared the brush away and gathered fir balms that had fallen for insulation and cushioning. While gathering I realized that there wasn't enough insulating material around to construct any kind of debris shelter in a reasonable amount of time. Survival there without a sleeping bag would've been a challenge. I took the poncho and part of the para cord strap from my survival kit and tied it to the trees above my sleeping bag. The poncho was the thinnest plastic you could imagine. You could easily see through it. I was able to rig up a shelter with it but I won't be putting it back in my survival kit. I'd rather have a sturdy trash bag. Luckily it didn't more than drizzle and there was little wind to worry about.
I gathered several fists full of twigs no more than pinky thick to make a small fire. The fire was mainly just for fun and to test my kit. I was able to start the fire with one match from my survival kit. The fire was small enough that I could huddle with my legs on either side. The challenge was to keep the fire small while at the same time providing it enough fuel and oxygen so it didn't smoke me out. Using such small sized fuel allowed me to completely burn up the fuel leaving only white ash.
I went to bed early. The temperature probably got to the low 40s which wasn't a problem for my 20 degree bag. I did close up the hole to my sleeping bag as much as I could. I never really got cold though. The fir balms didn't end up being as much cushion as I hoped and woke up often.
The next morning I broke camp at about 7am and headed for the trail. I started off with the bagel and ate apple chips and beef jerky as I hiked. Overall I covered about 11 miles in about 4 and 1/2 hours. The best part was when I remembered I had a Hershey's bar. Everything tastes so much better when you are hungry.
When I reached Pittock Mansion less than 4 miles from the end of the Wildwood Trail, I called my brother to come pick me up. I was out of food, water and my ankle was starting to hurt. Before he arrived I took a quick look at Portland from the back of the mansion. It was cool to see the city with Mt. Hood in the distance.
It was a fun little overnight. I got to somewhat rough it and test a few things in my survival kit. I also got to explore Forest Park and enjoy the nice weather.
Showing posts with label survival. Show all posts
Showing posts with label survival. Show all posts
Monday, February 23, 2009
Friday, July 11, 2008
Survival Kits
What would you do if you were given 1 day/1 hour/1 minute to gather everything you needed to survive for 1 day/1 week/1 month? You would probably panic and scramble around the house looking for supplies. Chances are you would grab some non-essentials and forget to grab some necessities. Now what would you do if you were at work, the same situation happened and you couldn't get home? Would you even be able to find necessities there?
These are the questions that survival kits, a.k.a. "Grab N Go" bags or "Bug Out Bags" are meant to answer. The idea is to have everything you will need already packed up so you can literally grab it and go. It is recommended to have a kit at home, work and in your car since you never know where you'll be when you need to bug out.
Each kit should contain items to satisfy these basic needs:
One of the benefits of making your own kit is that you can tailor it to your personal needs and skills. I, for example, have little experience fishing so I added more fishing gear than a more experienced person would need including a cheat sheet on tying fishing knots.
I don't ever plan to stake my life on these kits alone. In fact, I wouldn't feel confident in survival at all if I hadn't taken classes and practiced skills. In a long-term survival situation I see these kits as giving me a buffer period to make up for my lack of skill and experience. For example, I could make a fish hook from a piece of bone or wood, but I've never done that before so bringing fish hooks gives me time to learn how.
I decided to make three kits of different sizes. The first one is small enough to fit in my pocket so in theory I could take it with me always. It fits into an Altoids container. It's amazing how many useful things one can pack into such a small container.

Starting from the top left here are the contents and their possible uses:
These are the questions that survival kits, a.k.a. "Grab N Go" bags or "Bug Out Bags" are meant to answer. The idea is to have everything you will need already packed up so you can literally grab it and go. It is recommended to have a kit at home, work and in your car since you never know where you'll be when you need to bug out.
Each kit should contain items to satisfy these basic needs:
- shelter
- water
- fire
- food
- signaling or navigating for help
One of the benefits of making your own kit is that you can tailor it to your personal needs and skills. I, for example, have little experience fishing so I added more fishing gear than a more experienced person would need including a cheat sheet on tying fishing knots.
I don't ever plan to stake my life on these kits alone. In fact, I wouldn't feel confident in survival at all if I hadn't taken classes and practiced skills. In a long-term survival situation I see these kits as giving me a buffer period to make up for my lack of skill and experience. For example, I could make a fish hook from a piece of bone or wood, but I've never done that before so bringing fish hooks gives me time to learn how.
I decided to make three kits of different sizes. The first one is small enough to fit in my pocket so in theory I could take it with me always. It fits into an Altoids container. It's amazing how many useful things one can pack into such a small container.

Starting from the top left here are the contents and their possible uses:
- Altoids tin: boil water/cook, plate/cup, use the metal for tools (scraper, arrowhead, etc.), signal
- knot cheat sheet: tinder, leave a note
- Ziploc bag: keep other items dry, hold almost a quart of water for use with purification tablets
- fishing tackle (various sizes of hooks, swivels and split shot): stored in the little tube with the red top.
- needles (also included in the tube): clothing repairs, medical
- razor blades (also included in the tube); medical, process game
- circular mirror: signal, medical (find ticks and see wounds), personal hygiene
- compass: navigation
- saw blade: shelter, make wooden tools (ie: trap parts, arrow notches)
- 1 sq ft aluminum foil: cook food, boil water, fish/hunt/trap lure, signal, etc.
- 8 water purification tablets (enough for 2 gallons): make water drinkable
- fishing line wrapped in duct tape: fishing line to fish, clothing repairs, snare/trap parts; duct tape to repair, medical (wound closure)
- LED light (12 hrs): temporary convenient light source, signal
- safety pin wrapped in nylon: safety pin to repair, fish; nylon to fish, clothing repairs, shelter, snare/trap parts
- candle (cut to fit): fire, light, heat
- lint and petroleum jelly (in small bag): tinder (starts from a spark and when wet)
- waterproof matches (in latex): fire
- fire steel: fire (scrape off ignited metal filings)
- alcohol swab: medical, fire
- 2 butterfly closures: medical
- bandage: medical
- 10 ft of paracord (not pictured above): shelter, fishing line, trap/snare parts, keep kit closed, etc.
Everything packed in the kit
Paracord is very strong and is composed of an outer sheath with 6-7 smaller threads inside. It can be used whole or broken down into smaller pieces and is thus very versatile and useful.
The kit sealed with 10 ft. of paracord.
The second kit I made fits into a bag the size of a small camera case. The bag actually was a survival kit I bought from REI. Most of the stuff in it was junk, but the size of the bag was perfect and it had enough good stuff inside to make it worth the price. It is easy to sling over the shoulder or string through a belt. It weighs 2-2.5 pounds fully packed.

Starting from the top left here are the contents and their possible uses (where not already explained in pocket kit):
- red poncho: clothing, shelter, water collection, signaling
- 1 gallon Ziploc: water storage
- emergency blanket: shelter, water collection, signaling
- carrying bag with 25 ft. paracord strap
- square mirror
- money (I plan to put actual cash in when I can afford to): phone call, etc.
- orange whistle: signal
- 2 sq ft aluminum foil
- LED flashlight - the only flashlight I could find that combined the long-lasting LED bulb with the cost-efficient AA battery.
- 2 spare AA batteries
- needle tweezers: medical (tick, splinter removal)
- moleskin: medical (blister care, wound closure)
- length of nylon
- length of fishing line
- 4 water purification tablets
- 1 oz bottle of bleach wrapped with 2 ft of duct tape: water purification (6-8 drops/gal)
- candle
- camera film tube of lint and petroleum jelly
- fire steel (from http://www.survivaltopics.com/): bigger than the one in the pocket kit
- waterproof matches in latex: more than in pocket kit
- 2 needles
- 2 butterfly closures
- 1 Pepto Bismal tablet: duh!
- 4 500 mg acetaminophen: medical
- 2 bandages
- 2 alcohol swabs
- fishing tackle: more than in pocket kit
- 2 saw blades: the bigger one has a sharpened edge opposite the teeth for scraping wood
- 2 bullion cubes: food (replace salts, flavoring)
- fishing knots cheat sheet
- Ziploc to hold small items
- 2 razor blades
- 5 safety pins
Below you can see the case fully packed with the strap I made from the 25 feet of paracord. It is stronger than the strap that came with the bag and is more useful.

The third kit I'm still working on fits into a backpack. It basically includes everything included in the kits above but in larger quantities. It also contains the usual gear for a backpacking trip like a tent, clothing, stove, pots, knife, food, water and sleeping bag. I also plan to include a wild edible/medicinal plant book, my survival journal, passport, cash, work gloves, etc.
I was curious to see how well aluminum foil would work for boiling water. I took a 1 sq ft sheet and formed a crude bowl. I made a fire in my rocket stove and set the foil bowl on top. It successfully boiled water. The first time I tried it I wasn't careful enough with the foil. I ended up putting holes in it with the bending and shaping, so you do have to be a little delicate with it. But, I only needed one ply to be successful.

Wednesday, June 06, 2007
New friends
I'm still too busy working on my house to work on many skills, but I wanted to give shouts out to two friends who I've added links to on my site. First, under my "Links" section, I added a link to "Practical Primitive". This is an organization headed up by former Tracker School instructor Eddie Starnater. I most recently saw Eddie at the Baltimore Bowman event. He had a tent there teaching flintknapping and the bow drill and giving out free shirts. He offers mentoring sessions which is hard to find.
I also added a new link to my "Friends" section. Matt Bukowski, a former Tracker School caretaker/intern, started a blog. He lives with my brother in D.C. I last saw him at the Baltimore Bowman event as well.
Here's what little I've done since my last post. I went to a Gun and Knife show. I bought a new back pack there that is pretty dope. I plan to use it as my "Grab n' Go" bag in case TSHTF. I have it stocked with most of my gear presently. When I get it all stocked up maybe I'll do a post about it. I also bought a nice Spyderco folding knife for $60 since I didn't have a folding knife. Finally, I bought a magnesium match to play with. It took me less than a minute to get a fire with it the first time I tried it.
As I predicted, I ended up breaking the biface I pictured in the last post. The lesson I learned was, warm up on other rock before starting on a nice piece. Instead, I tried to take important shots right of the bat.
Finally, I started playing around a little with knife throwing. I only have one knife and I don't really have a good set up to practice with, but so far I can stick several in a row sometimes. It's probably not the most practical skill, but it is fun and cool.
Monday, July 24, 2006
Volunteering at Camp Delafield
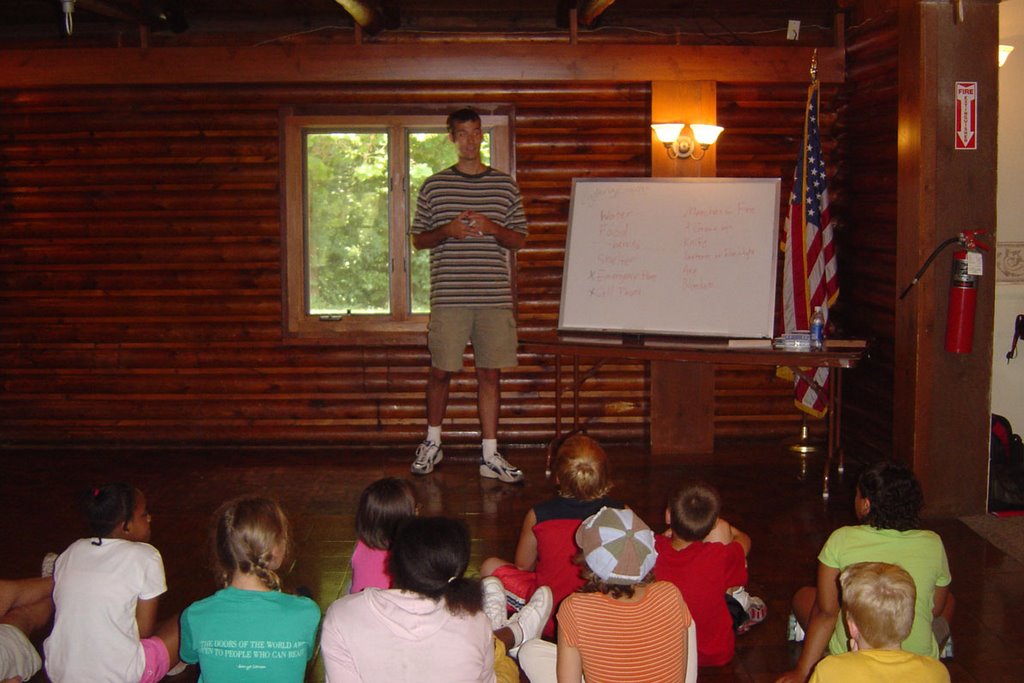
Last Wednesday I volunteered at Camp Delafield. It is a camp conducted by the Dyslexia Institute of Indiana. The children have academic tutoring and participate in recreational activities. I spent the afternoon there as a "mystery guest". In the past they've had fireman and police officers. I was there to teach a little about wilderness survival. It was pretty cool because I got to teach whatever I wanted. I came up with a pretty cool lesson plan.
I had the kids list the things they would need in a survival situation. I expected to hear some crazy stuff, but berries, a cell phone, and a grown up were about the craziest. They were pretty smart and listed all the important ones without my help. I wrote all their ideas on a dry erase board and then ranked each one for importance.

This allowed me to cover the Sacred Order of Shelter, Water, Fire and Food. I focused on shelter since it is the most important. After covering the importance of shelter location, I described the debris hut and how to build one. I asked, "So, are you ready to go build one?" The kids got really excited and immediately got to there feet.

I led them out to a site in the woods where I had already gathered the materials for a shelter. Then we all built the shelter together. It was cool to be able to actually illustrate the points I was describing in the lecture. The kids had a really good time. I heard a lot of them refer to it as a fort which is probably why they were so interested. Unfortunately there weren't really enough leaves around to even come close to finishing the shelter, but I think they got the basic idea.


On August 3rd I plan to go back to the camp for their campfire night. My plan is to light their campfire using my bow drill. Hopefully I can also teach them a little bit about fire.
I had the kids list the things they would need in a survival situation. I expected to hear some crazy stuff, but berries, a cell phone, and a grown up were about the craziest. They were pretty smart and listed all the important ones without my help. I wrote all their ideas on a dry erase board and then ranked each one for importance.
This allowed me to cover the Sacred Order of Shelter, Water, Fire and Food. I focused on shelter since it is the most important. After covering the importance of shelter location, I described the debris hut and how to build one. I asked, "So, are you ready to go build one?" The kids got really excited and immediately got to there feet.

I led them out to a site in the woods where I had already gathered the materials for a shelter. Then we all built the shelter together. It was cool to be able to actually illustrate the points I was describing in the lecture. The kids had a really good time. I heard a lot of them refer to it as a fort which is probably why they were so interested. Unfortunately there weren't really enough leaves around to even come close to finishing the shelter, but I think they got the basic idea.


On August 3rd I plan to go back to the camp for their campfire night. My plan is to light their campfire using my bow drill. Hopefully I can also teach them a little bit about fire.
Tuesday, March 07, 2006
Survival Documentary
When I was at The Shelter Challenge a week and a half ago, Kevin was telling me about his week of survival and how he and his friends wished they had taken a camera with them to record their experience. Obviously a camera isn't appropriate in a full survival situation. We got to talking about how cool it would be to have a camera crew come out and film the whole thing. Since then, I've been thinking about it a lot.
After seeing a show like Survivorman make it onto The Science Channel, I wonder why this idea wouldn't work. The idea I envision is getting a group of 5-8 people like me who are into survival skills and go somewhere to do full survival for some period of time. I think getting people of different skill levels would be important. To make the show interesting I think it would be better to have inexperienced people like me involved. Without some struggle, it wouldn't be as fun to watch.
The show could be a mix of reality tv and educational so you learn and are entertained at the same time. So at one point it shows the group actually building debris huts and then it cuts to an animated sequence showing the structure of a typical debris hut and the science behind how it keeps you warm. I imagine there is a narrator for the show to summarize events and explain the animation.
It would be cool because as the show progresses you can start seeing new skills. Of course you start with seeing how a shelter is built and then fire. Eventually you see traps and snares and hunting. If it went long enough you could see other things like basketmaking, tanning, and other crafts that you don't get into as much until you're settled.
I guess the idea is a lot like Survivorman except it would be a group of people who weren't experts and the conditions wouldn't be as extreme and it would be a longer period of time. Maybe it is just a one episode show our a documentary.
What do you think?
Thursday, February 16, 2006
Skill: Firebow
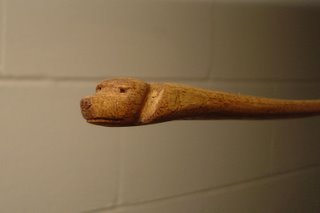
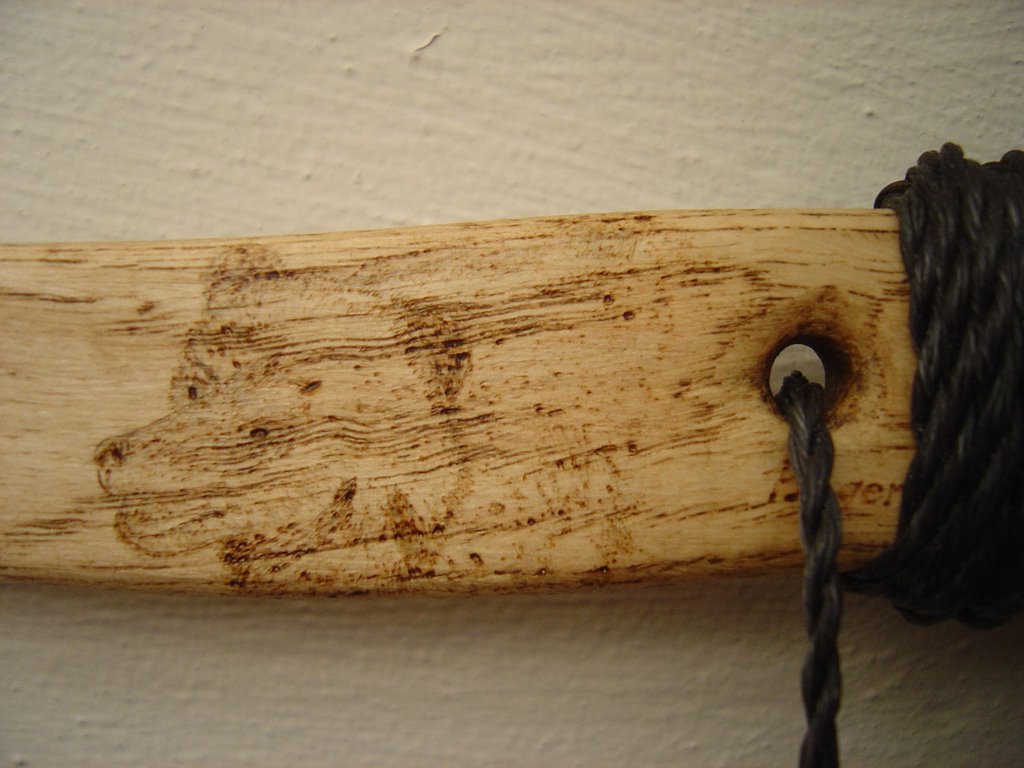
I finished my firebow. To finish it up I smoothed the surface by scraping it with a knife and sanding it. After that I wood burned a freehand bear design near the handle and also added detail to the carved bear head tip. I then stained the whole piece. The last step was to wrap the handle in some leather strips.
Here is the finished piece.

In a short term survival situation, you're probably not going to take the time to make one like this. You would just grab a sturdy stick nearby. You might, however, make one like this if you are in a long term survival situation. There are a couple nice things about this stick. First, the cord length can be quickly changed without having to tie a knot. In fact, you don't ever need to tie a knot. This is handy since it can easily adjust to different spindle diameters. Second, it has a comfortable handle which is good to have when cranking away at a coal.
Here is the detail of the bear. I first sketched the design with pencil based on a picture I found and then burned over it. I like how it blends in with the grain as if the tree grew that way naturally. Also you can see the hole where you can feed or take up slack on the string.

Here is the tip after wood burning and stain.
I can't wait to bust a coal with this thing!
Here is the finished piece.

In a short term survival situation, you're probably not going to take the time to make one like this. You would just grab a sturdy stick nearby. You might, however, make one like this if you are in a long term survival situation. There are a couple nice things about this stick. First, the cord length can be quickly changed without having to tie a knot. In fact, you don't ever need to tie a knot. This is handy since it can easily adjust to different spindle diameters. Second, it has a comfortable handle which is good to have when cranking away at a coal.
Here is the detail of the bear. I first sketched the design with pencil based on a picture I found and then burned over it. I like how it blends in with the grain as if the tree grew that way naturally. Also you can see the hole where you can feed or take up slack on the string.
Here is the tip after wood burning and stain.

I can't wait to bust a coal with this thing!
Subscribe to:
Posts (Atom)

