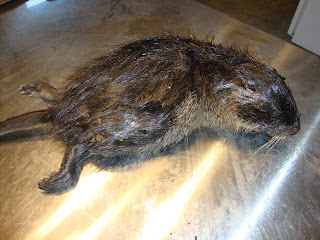
Since moving to the Portland area, I've been able to see them alive in the wild. There are at least three that I see from time to time at work. I've often mentally hunted and trapped them. They are pretty trusting around humans. The Trackers Northwest group sometimes teaches classes where they trap Nutria so I've seen hides in the tanning process. In fact, I'm told this Nutria came by way of TrackersNW.
I laid it out on the stainless steel table my brother and I bought a year ago with butchering animals in mind. No worries with blood and guts soaking into wood. It also is a high table so it's comfortable to stand around when working. It's worked for bison, deer and now nutria. I digress.
The body wasn't stiff so that made it easy to work with. The smell was only mild. Not bad.

With the bison we cut a line down the center of the belly, cuffed the legs and the neck. With the nutria I "case" skinned it instead. I still cuffed the legs, but the only other cut was around the anus (and later the tail) and connecting that to the back leg cuffs as seen in the picture below. I used two flakes of obsidian for all the cutting. One flake is at the bottom right corner of the picture.

Once I got started it was relatively easy to pull the skin over the animal until I got to the head. The head took a lot of time because of the eyes, ears and mouth. The plan is to tan the full hide including the head. In the picture below you can see the skin rolled right over the animal and is hanging on only by the tail. I ended up cutting the tail skin off completely because it didn't want to come off the body.

The last step was to fashion a stretching board. I used an old shelf and shaped it to fit the animal. Now I will let it dry out. The next step after drying will be to scrape all the meat, skin and other parts off. Sitting by the wood stove this guy should dry out faster than the bison.

I decided that I wasn't going to eat the meat because I didn't know how long it had been dead and exactly where it came from. My brother wanted to keep the bones though so I did get some practice gutting. It was a piece of cake compared to a bison.
Read Part 2 here.

7 comments:
Good Job Michael.
I'm not sure, but it looks like you may not have split the tail before trying to skin it out. I know it is frozen now, but next time you can cut it from a-hole to tip on the ventral (under) side and the flay it open and peel out the meat and bones.
Yeah, I didn't split the tail. I guess I didn't really think about the right way to do that. I've never tanned a hide with a tail. That makes sense though.
hi,
will you brain-tan the hide, or use chemicals? the kids and i have done both this year but the chemical is easier in the cold wet weather.
any trouble with the hair slipping?
great blog!
Pat
Thanks for the comment. I probably will not brain-tan it. I have the brains frozen still in the skull but I don't think I will mess with it. I will probably use soap and oil. The hair hasn't slipped yet, but I just racked it two days ago so anything could happen.
flesh condom. nice
Is there a reason why you wait for it to dry first before fleshing? I have always wet-fleshed on a fleshing beam prior to boarding. A two-handed bannana-shaped knife is used to push off fat and muscle. I've never tried dry-fleshing because I never wanted the smell of drying/rotting flesh around (it can cause the pelt to rot and go green too) and also I thought dry fleshing was for split-skins only?
I did it that way because it allowed me to do the hide tanning over the course of several days. After skinning the animal I didn't have to get right to fleshing it before it rotted. A more extreme example is the bison hides I've worked on. Imagine trying to flesh one of those in one go.
I haven't had too much problem with rotting during the drying process. The nutria was small and thin and by the wood stove so it only took a few days to fully dry. The first bison hide took a couple weeks to dry out. It definitely smelled and rotted in some places. My brother and I wet scraped those parts where fat and meat were still on the hide and other thick places during the drying process. The second hide is racked up and dry outside right now. It didn't take long at all to dry outdoors with the help of the wind and sun.
I think dry scraping a case-skinned hide is the way to go because a dried hide gives you the time you need to do the detailed work around the face and appendages.
Thanks for your comment
Post a Comment