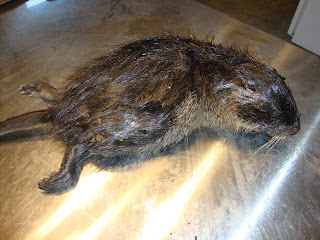
My brother came over today and brought me a gift. A dead nutria. I've wanted to tan one for awhile. My first introduction to the nutria was when my SCA crew bought a tanned hide and sewed it into a pouch as a gift for our crew leader. She loves soft, cuddly animals.
Since moving to the Portland area, I've been able to see them alive in the wild. There are at least three that I see from time to time at work. I've often mentally hunted and trapped them. They are pretty trusting around humans. The Trackers Northwest group sometimes teaches classes where they trap Nutria so I've seen hides in the tanning process. In fact, I'm told this Nutria came by way of TrackersNW.
I laid it out on the stainless steel table my brother and I bought a year ago with butchering animals in mind. No worries with blood and guts soaking into wood. It also is a high table so it's comfortable to stand around when working. It's worked for bison, deer and now nutria. I digress.
The body wasn't stiff so that made it easy to work with. The smell was only mild. Not bad.
With the bison we cut a line down the center of the belly, cuffed the legs and the neck. With the nutria I "case" skinned it instead. I still cuffed the legs, but the only other cut was around the anus (and later the tail) and connecting that to the back leg cuffs as seen in the picture below. I used two flakes of obsidian for all the cutting. One flake is at the bottom right corner of the picture.
Once I got started it was relatively easy to pull the skin over the animal until I got to the head. The head took a lot of time because of the eyes, ears and mouth. The plan is to tan the full hide including the head. In the picture below you can see the skin rolled right over the animal and is hanging on only by the tail. I ended up cutting the tail skin off completely because it didn't want to come off the body.
The last step was to fashion a stretching board. I used an old shelf and shaped it to fit the animal. Now I will let it dry out. The next step after drying will be to scrape all the meat, skin and other parts off. Sitting by the wood stove this guy should dry out faster than the bison.
I decided that I wasn't going to eat the meat because I didn't know how long it had been dead and exactly where it came from. My brother wanted to keep the bones though so I did get some practice gutting. It was a piece of cake compared to a bison.
Read Part 2 here.
Sunday, November 22, 2009
Monday, November 09, 2009
Cauliflower Mushroom
Sunday I took a walk in the woods to find a spear shaft. It was one of those slow walks where I walked at the pace of nature stopping to identify trees with my field guide. In an hour's time I covered probably only half a mile. I was looking for young maple trees of a diameter suitable for a spear shaft, but had no luck. I got to know that area of the woods a lot better though.
As I approached a creek crossing I spotted this beautiful cauliflower mushroom below. It was growing at the base of a very large cedar stump.
I cut it from the ground leaving much of the root in place. Hopefully the mushroom will be back next year or the year after. When I got it home it weighted in at 6 lbs. One field guide I read said they grow up to 30 inches wide and 40 lbs.
I am a complete beginner when it comes to harvesting wild mushrooms so I'm pretty nervous about eating them. This one however is pretty easy to identify and is considered one of the best to eat. Tonight I tried a small portion fried up in butter. It was pretty good. My plan is to eat a little more each time to make sure my body is OK with it. In conclusion, free wild food is awesome!
Sunday, September 27, 2009
The Chickens Have Arrived
I finally got my chickens yesterday. I picked up 8 young hens from a person I contacted via craigslist. They were $12 each which is the best deal I found. Most ads I saw priced them at $15-20. Before I get ahead of myself, let's talk about the run.
I wanted at least part of the run to be tall enough for me to walk around in so I decided to build a ~6 ft tall door. I sunk two posts I found and then built a door with some 2x4s I bought.
Next I pounded in metal posts I found. They were various heights so it was interesting to figure out the best arrangement for them. Basically the height of the run got shorter the further from the door. There were even a few really short ones that I used to support a metal roof piece I found. This will provide some shade and shelter from the rain.
I added a few more 2x4s on top of the door posts and to the first set of metal posts to make the run a little more solid. I ran the chicken wire out 6-12 inches on the ground and laid rocks on top to prevent the dog from digging under and murdering the ladies. I may try to make this a little more presentable in the future. I'm thinking about putting soil on top and planting something the chickens will eat.
The extra height allowed me to add in some roosts at various heights and a rope swing. I'm hoping these things will keep them entertained. I haven't seen them use them yet though. I also noticed tonight that at least some of them weren't using the roosts in the coop so maybe they just don't want to roost.
Here are the chickens minutes after arriving. They immediately went for the feed and then a dust bath. Also notice Ace casing the joint.
The chickens scratching and bathing. I believe I have 5 Rhode Island Reds and 3 Buff Orpingtons. I made my own feeder and waterer to save money. I think they will last awhile without need of a refill. In the future I would like to hook up a rain catchment system to supply the water.
I think these are Buff Orpingtons, "Buff" being their color.
When I woke up this morning there was one egg in the nesting box. After work there were three more. You can see that they are different sizes, shapes and colors. I think these chickens are 5-6 months old and are just starting to lay. Some may not be laying yet. I ate the eggs tonight and they were tasty. The yolks were very dark yellow.
The only issue so far is that it looks like I underestimated the size of chicken poo. The poo isn't falling through the screen on my droppings boxes. I think I will buy a screen with a larger mesh size. Otherwise it defeats the purpose.
BONUS PIC - I noticed this kind creature praying for my chickens. I haven't seen one of these guys since I was a kid. Good vibes!
Tuesday, September 15, 2009
Chicken Coop Conversion
I've been working on converting my doghouse into a chicken coop for many weeks now. Last week I finally finished. It was a challenge to customize an already existing structure and to use as many free materials as I could.
I started by elevating the structure on cinder blocks and wood I scavenged. I did this because it is my understanding that chickens like to roost off the ground and almost every coop I've seen is elevated. Raising the coop without assistance was a chore because the doghouse was pretty heavy. I used a combination of levering and my car's jack to elevate it into place. It was also a pain to get all four corners level since it is on a slight hill.
I next cut out the side to add on a nesting box. This provided a few benefits. First it made the overall size of the coop larger to comfortably accommodate more birds. Second it will allow me to gather eggs from outside the coop and soon to be added run.
The nesting box was completed with wood that I already had. The two sides were recycled from the pieces I cut from the doghouse wall. The box is very large compared to the recommended size I read and should have more than enough room for the six chickens I plan to buy.
The part that took me the most time was the removable droppings boxes. It took some time and money to figure out how to make them work. I'm satisfied with the final product. The benefits of my design are as follows. First, the screens are removable so I can clean the droppings out of the boxes. Second, the boxes are sized so I can remove them from the coop for easier cleaning. The final product is a floor that is easy to clean and prevents the chickens from walking around in their own poop.
You can see the box on the left has the removable screen on it and the one on the right doesn't.
I added a removable piece to make the doorway chicken-sized. It should help retain chicken body heat in the winter, prevent drafts and make the chickens feel more secure. I screwed in a wood block that swivels to lock the piece in place. I then added a ramp to assist the birds in entering the coop. I may need to add some more rungs.
Luckily the roof of the doghouse extended many inches to cover the nesting box add-on so I didn't have to waterproof it.
Inside I added two roosts cut to size from some dead branches I found in the forest. They are mounted using clothes-hanger-rod hardware in case I ever need to remove them or replace them. I also rounded the edges of the 2x4 rafters with a rasp to make them comfortable for roosting. Finally, I found the pretty pink paint that was left in the shed and coated the new parts.
She ain't the prettiest, but I think she'll work great. I'm currently working on the run. At first I thought of letting the chicken roam the whole fenced in yard, but I've seen too many hawks and owls around, not to mention all the predators I haven't seen and my friend's dog who likes to destroy things of mine.
Wednesday, September 02, 2009
Glass Buttes Trip - Fall 2009
Last weekend we made another trip to Glass Buttes. This time we had a bigger crew. In total there were ten of us in three vehicles, but the five crammed into the Honda were off on their own once we got there. We saw them once a few hours before we left to go home on Sunday.
The crew I hung with is pictured below: Shawn, Andrew K, Shaun, Andrew P and me. I guess I should have been named "Sean" to keep the pattern going. :) In the background you can see Big Glass Butte.
When not cooking various non-refrigerated pork products, we spent most of our time on my favourite hilltop gathering and breaking rock.
I love this hilltop because it offers modest-sized surface rocks for easy picking or mystery-sized underground rock for some extra effort. It's odd because as you walk around it's mostly grasses, shrubs, and dirt but then every 60 yards there is a stream of rocks running down the hill.
Sometimes when you dig you get a nice reward for not too much work. Shawn found this monolith partially excavated. After some work he pulled out a big'n. Sometimes you dig and hit just the tip of an iceberg and work on it for hours with nothing to show for it.
Here Shaun teaches his friend Shawn the principles of flintknapping.
Andrew K studying his rock to decide where to make the first strike.
Saturday afternoon The Andes ("Hot Fuzz" reference) and I drove to another location where a different type of rock was available. Dacite is like obsidian but a little harder and less brittle. We collected a lot of it. We collected enough to make my car bottom out trying to get from the quarry to the main dirt road. We had to unload the rock to get my car out.
In the picture below, Andrew K and I reduce the big rocks down to usable pieces. This reduced the overall weight of the load while, in theory, still allowing enough material for a nice finished product.
In then end we each got enough rock to last for awhile. I'm excited to get to work on the dacite. There is just so much to do at the new place especially since hunting season started last Friday.
These pictures are from my new camera. Tonight I should have internet access at home. So now I have no more excuses for not posting more often.
Monday, August 10, 2009
New House
A week ago I moved from Portland out to the country. I scored a pretty sweet deal. I am living in a 3 bedroom house at the entrance to a 140 acre private forest. In exchange for below average rent, I just have to mow the lawn and keep an eye out for funny business. I always dreamed of living somewhere where I could walk out my door and into the woods and now I can.
In this aerial photo courtesy of Google maps, you can see my house and the approximate boundary of the property. It's all available for me to play in! You can learn more about the forest here. It is open to the public for hiking and learning about nature and forestry.
Here are some pictures to give you an idea of what the place is like.
It's kind of wasteful to have such a big lawn, but I've already started planting crops in the raised beds and hopefully I can add more beds next spring.
This is the view from the front porch. Beyond the tree line is a parking lot and facilities buildings. The raised bed full of weeds in the bottom right corner is going get replanted with veggies.
The backyard is pretty nice. I'm going to try to convert the doghouse into a chicken coop. When I get chickens they will free range in the ample fenced in area. And yes, that's a horseshoe pitch. Not sure how much use that will get.
This is the view from the back porch. Last night I sat behind the rail and watched two blacktail deer feed. They made their way from the left side of the field and came all the way to the fence before heading to the blackberry patch out of view on the right side of the picture.
The sky is the limit for this place.
In this aerial photo courtesy of Google maps, you can see my house and the approximate boundary of the property. It's all available for me to play in! You can learn more about the forest here. It is open to the public for hiking and learning about nature and forestry.
Here are some pictures to give you an idea of what the place is like.
It's kind of wasteful to have such a big lawn, but I've already started planting crops in the raised beds and hopefully I can add more beds next spring.
This is the view from the front porch. Beyond the tree line is a parking lot and facilities buildings. The raised bed full of weeds in the bottom right corner is going get replanted with veggies.
The backyard is pretty nice. I'm going to try to convert the doghouse into a chicken coop. When I get chickens they will free range in the ample fenced in area. And yes, that's a horseshoe pitch. Not sure how much use that will get.
This is the view from the back porch. Last night I sat behind the rail and watched two blacktail deer feed. They made their way from the left side of the field and came all the way to the fence before heading to the blackberry patch out of view on the right side of the picture.
The sky is the limit for this place.
- Hunting? - Hopefully I will be allowed to hunt there this fall
- Room to practice skills (no more tanning bison hides in an apartment)
- Ample materials - I was told more than once I can cut wood and gather pretty much whatever I want
- Foraging - From the blackberry patch in my backyard to the apple tree in the front, there is so much out there, I just have to find it
- Homesteading - chickens, garden, wood stove, water well, hunting, goat?
Sunday, June 14, 2009
Bison Soap
Today I made my first ever batch of soap. My brother took a soapmaking class a number of months ago so he guided me through the process. First I looked for a recipe using bison fat but couldn't find one. I guess not many people get their hands on bison fat these days. Meanwhile my brother and I have 5-gallon buckets full. :)
I substituted beef fat when looking up how much lye to use. Hopefully I calculated it correctly. It's something you really don't want to mess around with. If your lye to fat ratio is wrong then you might end up with a chemical burn like Ed Norton in Fight Club. I had the balsamic vinegar standing by just in case.
The recipe I created was:
I weighed the lye crystals on the coffee filter carefully using the electronic scale. Then I mixed them into the bowl with 1/3 cup of water on the right. The water and lye reacted chemically and heated up.
Meanwhile I melted the bison fat and started monitoring the temperature of both the fat and the lye mixture.
It took some jockeying to get both temperatures to drop to 98 degrees at the same time. I ended up chilling and reheating the fat, but eventually I zeroed in on the target temperature. Once the temperature of the fat and the lye were both around 98 degrees I poured the lye into the fat and mixed.
I stirred for about 10-15 minutes to fully mix the lye with the fat. As it cooled it started to thicken. Once a drip from the spoon lingered on the surface of the mixture I knew it was time to pour.
I quickly mixed in the paprika and vanilla oil and then poured it into a plastic mold.
I'm kind of surprised at how much the ingredients made. Now I will let these set up for 3-4 days. Then I will knock them out and let them cure for 3 weeks. Hopefully the final products will not burn me.
I substituted beef fat when looking up how much lye to use. Hopefully I calculated it correctly. It's something you really don't want to mess around with. If your lye to fat ratio is wrong then you might end up with a chemical burn like Ed Norton in Fight Club. I had the balsamic vinegar standing by just in case.
The recipe I created was:
- 1 cup rendered bison fat
- 60.8 grams lye
- 1/3 cup water
- paprika added generously for color
- ~ 1 teaspoon vanilla essential oil for scent
I weighed the lye crystals on the coffee filter carefully using the electronic scale. Then I mixed them into the bowl with 1/3 cup of water on the right. The water and lye reacted chemically and heated up.
Meanwhile I melted the bison fat and started monitoring the temperature of both the fat and the lye mixture.
It took some jockeying to get both temperatures to drop to 98 degrees at the same time. I ended up chilling and reheating the fat, but eventually I zeroed in on the target temperature. Once the temperature of the fat and the lye were both around 98 degrees I poured the lye into the fat and mixed.
I stirred for about 10-15 minutes to fully mix the lye with the fat. As it cooled it started to thicken. Once a drip from the spoon lingered on the surface of the mixture I knew it was time to pour.
I quickly mixed in the paprika and vanilla oil and then poured it into a plastic mold.
I'm kind of surprised at how much the ingredients made. Now I will let these set up for 3-4 days. Then I will knock them out and let them cure for 3 weeks. Hopefully the final products will not burn me.
Wednesday, June 03, 2009
Bison Hide Tanning Part 2
Two weeks ago my brother and I made our first attempt at tanning the bison hide. We were given access to the TrackersNW facility so we were able to move the project from our apartment to a more adequate setting. We started Friday evening by cleaning the hair with shampoo and conditioner. As recommended on the bottle, we rinsed and repeated (about 8 times). When we finished we left it to dry overnight.
Saturday afternoon we took a short kayaking trip on which I capsized and got my brother's camera a little wet. As a result I wasn't able to get pictures of the tanning process which is a shame because they would have been good. Luckily, the camera is fine. After the trip we returned to the hide to apply the dressing. We mixed up soap, neat's foot oil and the bison's brain (a traditional tanning dressing) and spread it on the hide to soak in. We used a softening stick we made to push the dressing into the hide. A softening stick has a wide flat end so you can massage the hide with more surface area. We left the dressing on the hide overnight to give it more time to saturate.
Sunday morning we started the drying and stretching process. This is usually the most tedious part of the process because you have to continually stretch the hide until it is completely dry lest it become stiff. This can take many hours. The sheer size of the bison hide made this especially difficult. Luckily the weather was warm and we had sunlight to help speed up the process. We started by leaning the frame up against a tree. At this point the hide was still dripping with the dressing. We used the softening sticks we made to stretch the hide.
We were happy with how quickly the surface seemed to dry out. The hide got really stretchy and it took a lot of force to give it a full stretch. Eventually we laid the frame on 5 gallon buckets like a trampoline and used our body weight to fully stretch the hide. This is where it would have been nice to have some pictures. :( We took turns walking around on the hide. The hide stretched so much in the middle that it touched the ground and we had to raise the frame higher with some wood risers. We also rubbed it with pumice stones to soften it.
As the day wore on we realized that while the middle was fairly soft and stretchy, the sides were rather stiff. We decided to call it a day. We took it off the frame. The next morning the middle was still pretty soft. The rest was pliable, but still pretty stiff. For example, you could wrap it around you if you had to but you couldn't make clothes out of it. So that is the current state. We may try to tan it again, but we are afraid it might start to fall apart. We already lost some hair and put a few more holes in it while stretching it.
There are a few reasons why I think the sides may have been stiff. First, we may not have had enough dressing. When we left it overnight it settled in the center of the hide. Second, it was harder to stretch the sides because they are closer to the frame. On a trampoline the middle is where you get the most bounce. Next time I think we need to make sure the sides get saturated with dressing. Maybe we can loosen the hide in the frame so we can stretch the sides more.
Tuesday, May 19, 2009
Bison Hide Tanning Part 1
My brother and I might be the only people ever to try to tan a bison hide in a two bedroom apartment. It's quite ridiculous if you think about it. It's one of the more messy and stinky projects one can work on indoors. We started with a raw bison hide fresh from the butchering class. The fur side had a lot of dirt balls, poo and other natural materials matted into it. The flesh side had meat, fat and membrane to remove. All together it produced quite an aroma.
Our first goal was to clean the fur so we wouldn't get mud and poo everywhere. It was not an easy task because we didn't have a convenient way to clean it outdoors. The bathtub was the option we choose. It took many, many rinsings before the water was not black with filth.
We soaked it in the tub for a couple days and started to become concerned that it would start rotting. My brother actually managed to take a shower with the thing. We got the fur about 80% clean and then propped it up to dry it. It was a heavy son of a gun with the fur saturated in water.
After wringing out the hair, we laid it out in the living room inside a frame. Andrew made the frame with some 2 by 6s about 8ft by 8ft. We laid out a bunch of blankets and plastic wrap underneath to not destroy the carpet.
Notice how dirty the flesh side is at this point. The white sections are places where we cut off meat and fat.
We used a heavy duty hole punch to make holes around the perimeter of the hide. Then we used little S hooks for stringing it up. These really made it easy. Without them we would have had to run the rope through each hole which is a pain. Also with the hooks it was a lot easier to adjust the set up which we did a few times.
After framing it we set it up against the wall. You may notice that the hide is really bigger than the frame. After a couple days we ended up cutting a few square feet of the hide off and restringing the whole thing. Otherwise the saggy parts like the top would have taken a long time to dry out.
For a few days the hide was still wet enough to use a wet scraping tool. In the picture, Andrew is using a sharpened bone.
As the hide dried out, we used a sharper metal scraping tool. We had to resharpen it many times to complete the scraping.
The red bowl is filled with hide scraping that we used to make hide glue.
To completely dry out the hide it took about two weeks. We had a couple fans running 24/7. In this final picture you can see how the hide was trimmed down in size. At this point most of the scraping was finished.
So far it's been an interesting project. Its progress could best be measured by the smell. The farther along we got, the less stinky it became. It was definitely pretty awful for the first week. At this point we have completed the scraping and thinning. While this was a lot of work, the hard parts still remain. Next we will finish washing the hair. Then we'll soak it, soften it and smoke it. I'll post the results of those steps in Part 2.
Our first goal was to clean the fur so we wouldn't get mud and poo everywhere. It was not an easy task because we didn't have a convenient way to clean it outdoors. The bathtub was the option we choose. It took many, many rinsings before the water was not black with filth.
We soaked it in the tub for a couple days and started to become concerned that it would start rotting. My brother actually managed to take a shower with the thing. We got the fur about 80% clean and then propped it up to dry it. It was a heavy son of a gun with the fur saturated in water.
After wringing out the hair, we laid it out in the living room inside a frame. Andrew made the frame with some 2 by 6s about 8ft by 8ft. We laid out a bunch of blankets and plastic wrap underneath to not destroy the carpet.
Notice how dirty the flesh side is at this point. The white sections are places where we cut off meat and fat.
We used a heavy duty hole punch to make holes around the perimeter of the hide. Then we used little S hooks for stringing it up. These really made it easy. Without them we would have had to run the rope through each hole which is a pain. Also with the hooks it was a lot easier to adjust the set up which we did a few times.
After framing it we set it up against the wall. You may notice that the hide is really bigger than the frame. After a couple days we ended up cutting a few square feet of the hide off and restringing the whole thing. Otherwise the saggy parts like the top would have taken a long time to dry out.
For a few days the hide was still wet enough to use a wet scraping tool. In the picture, Andrew is using a sharpened bone.
As the hide dried out, we used a sharper metal scraping tool. We had to resharpen it many times to complete the scraping.
The red bowl is filled with hide scraping that we used to make hide glue.
To completely dry out the hide it took about two weeks. We had a couple fans running 24/7. In this final picture you can see how the hide was trimmed down in size. At this point most of the scraping was finished.
So far it's been an interesting project. Its progress could best be measured by the smell. The farther along we got, the less stinky it became. It was definitely pretty awful for the first week. At this point we have completed the scraping and thinning. While this was a lot of work, the hard parts still remain. Next we will finish washing the hair. Then we'll soak it, soften it and smoke it. I'll post the results of those steps in Part 2.
Monday, March 30, 2009
More Than Meat
There was plenty of work to do following the butchering class discussed in my last entry. Steaks and roasts were only one of the products harvested from the animal. My brother and I spent most of Sunday working on sinew, fat, bones and hide.
I cleaned up the sinew separating meat and fat from the tendons and ligaments as my brother scraped the remaining meat from the bones.
Cleaning the sinew
There was quite a lot of sinew. The leg tendons were very long. After cleaning it, I hung it up to dry.
After about a week it was fully dry.
Breaking up one small piece gave many strands to work with. The amount pictured below is enough for many small projects.
Our class collected a lot of fat. Besides this pile we have a five gallon bucket full. We have been rendering it for the last week. There is just so much of it. It's pretty silly. Stay tuned for a forthcoming blog entry with details on rendering fat.
Here my brother boils the meat off some of the bigger bones. Barely visible in the background is a pot of fat being rendered.
We also started to work on the hide, but I'm going to save that for another blog entry. If we do another butchering class we are thinking about having a second day where we teach what to do with the non-meat parts: bones, hide, sinew, fat, organs and more.
Subscribe to:
Posts (Atom)