Last weekend I started tanning my first deer hide. I soaked the hide in a bucket of water and wood ash for about a week to get the hair and grain to come off more easily. The picture below is what it looked like when I started to scrape off the hair.
After I scraped the hair and grain off, I then flipped it over and scraped of the mucous layer. The hide had a lot of holes near the edges so rather than spend time scraping these areas, I just trimmed them off. The picture below shows the hide after scraping both sides. There is still some grain left that I'll try to scrape off. After that the next step will be to brain it.
I had to put the hide in the freezer because I don't have enough time to work on it now. I'm getting ready to sell my house so I may be posting less frequently for awhile.
Monday, March 26, 2007
Monday, March 12, 2007
Viburnum Basket
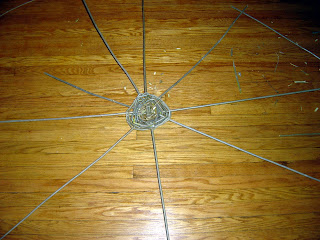
When I got home from my gathering trip on Saturday, I made a basket. This is the first basket I've made of this style so it isn't flawless by any means. It is kind of lopsided, but nevertheless functional which is what really matters. Some people like to let the wood dry and then soak it to make it flexible again. This is so the wood has shrunk to it's final size before making the basket.
I thought it would be cool to have a basket made the same day I collected the material so I didn't do this. To get an idea of how to start the basket I referred to Torjus's post about his willow basket. You'll notice that this first picture looks like one of his pictures. For more detailed instructions on how to make one, refer to his post.
After getting it started, it was pretty easy. The only other hard part was the change from horizontal rings to vertical rings. It was tough because the thickness of the spokes made it hard to accomplish a near right angle bend. This is the main reason why the basket is lopsided.
Ideally I would have made the basket a little taller, but I ran out of material. To make a handle I bent over some of the spokes and wrapped them together. The other spokes I cut off. Due to their thickness there was no nice way to weave them back into the basket. I'm all ready for the annual Easter Egg hunt at my parents' house! :)
Sunday, March 11, 2007
Gathering Viburnum
As I mentioned in my last post, I decided to go to Eagle Creek Park over the weekend to gather some viburnum. It was our second day of 50F+ degree weather in Indianapolis this year so it was a perfect day for it. There was still a little bit of snow and ice around, but most of it had melted and most of the area I was in was very wet. I was very glad to have brought my rubber boots. I spent a portion of my time standing in 3 inch deep water since that is where a lot of the viburnum was.
My primary goal was to find potential atlatl darts (spears). My theory is that a good arrow wood is also a good dart wood. Viburnum is awesome because it grows straight and long. It doesn't put out branches unless it has reached sunlight, so some of the shoots in the middle of the patch grow 15 feet high or more without any knots or branches. The middle of the patch is where I looked to find my atlatl darts.
While I was looking, I also found some nice arrow shafts. As I trimmed the darts and shafts down to size, I ended up making a pile of thinner pieces. I decided I almost had enough to make a basket. Viburnum is also nice for making baskets because of the long semi-flexible branches. Long material means fewer ends to tuck in when weaving. Some of my basket material was 7 feet long.
At the top is my basket making material. The middle branches will become arrow shafts, and the long ones on the bottom will hopefully become atlatl darts. I will be straightening them as they dry out.
Most of the viburnum was off the main path I was on. I spent over an hour moving from one patch to the next looking for candidate darts. On my little journey I came across a few interesting things. Below is a dead stump that caught my attention. I scraped some chunks off and then ground them up in my palm. It can be used as a coal extender when making fire by friction. For those of you who don't know what I'm talking about, coal extender is basically fuel to keep a coal burning until such time as you can blow it into a flame. I broke off a couple big chunks to take home and try out.
On my way back to the main trail I stumbled across a little metal tin. It was odd because it was covered in camouflage duct tape. I had no idea what it was and the scout in me was a little nervous since it was camouflaged. Convinced that the park was clear of bombs, I opened it. It was a geocache.
Basically it is a little treasure box that people locate with a GPS device using coordinates posted on geocaching.com. People take and leave trinkets and sign the booklet. I signed it for fun and noted that I found it without a GPS device to let future seekers know that I'm better than them. :) Just kidding.
There is a navigation trick I've seen in almost every survival book I've read but never tried before. Before I went on my excursion into the viburnum patches, I set it up. I put a stick in the ground and marked the top of the shadow it cast with a small twig. When I came back about an hour later I marked the shadow again with a twig. I then laid a branch so that it intersected both points. This made an east-west line. From there I found north and south. It probably would have helped to have a compass to confirm to myself that this works, but it seemed to be correct based on my understanding of where I was.
Tomorrow I will post pictures of the basket I made when I got home Saturday.
Sunday, March 04, 2007
First Atlatl
I started making my first Atlatl recently. For those of you who don't know, an atlatl is a spear thrower. It it basically a lever that allows you to throw farther (and probably more accurately) than with just your arm. It is the precursor to the bow. Coincidentally, I am making it out of one arm of a bow I broke during tillering.
Below is the what I started with. It is half of a bow including the handle at the top of the picture. Looking at the bend below the handle, you begin to see why this bow broke.
I referred to a few websites and texts I have to get an idea of the approximate dimensions of an average atlatl. This one is 23 inches long. Here it is after cutting it to size and some basic shaping.
I carved in a groove and spur with woodworking tools. This is where the end of the spear will be inserted. The spear end will be hollowed out to accept the spur.
Depending on the weight of the spear(s) I make, I may or may not add a weight to the atlatl. From reading, I found that it is good for the atlatl to weigh a similar amount as the spear. If it is too light or heavy in comparison, accuracy and distance suffer. Since I don't have any spears yet, I am not going to commit to a certain weight. Below is an example of how a weight might be added. Of course I will attach it with something a little nicer looking when I have it all figured out.
As with many survival arts, you can make a quickie version. Just pick up a stick that has a branch at the end for the spur. From reading, it sounds like preparing a spear is the real art form. Length, weight and spine (flexibility) are all important. I imagine when the sap is down in winter is the best time to harvest. I may have to make a visit to the old viburnum patch assuming good arrow shaft shrubs also make good spear shafts.
Antler atlatl from New York Museum of Natural History. Picture taken by my brother.
Subscribe to:
Posts (Atom)