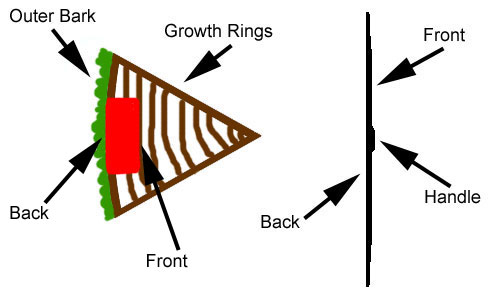
 On the left of the diagram you can see a wedge of wood. The red square represents the bow. The first rule of bow making, is that the back of the bow should be comprised of one growth ring. If the back of your bow is made of more than one growth ring then it is likely to break.
Before we get to our first step, let's look at a couple of tools we'll need. In the next picture, you can see my bowhorse. This device allows the wood to be secured at an angle that is ideal for work. On the bowhorse is a draw knife which is our primary tool for this part. Also note the stave of wood on the ground that is now my complete bow from the teaser post.
 The first thing to do, is remove the outer bark. You can be pretty aggressive with the draw knife here. Once you get the outer bark off, you are left with a thin inner bark. Once you start seeing this smoother inner bark you should be careful. The next layer is the first growth ring. The first growth ring will be a very light color in most woods, but can be yellow in a wood like Osage Orange. I'm using hickory so it is light.
In the next picture you can see my stave with the bark taken off. The light brown is the inner bark and the white color is the first growth ring. Since the wood can have dips and rises in it, you really have to be careful when removing the inner bark layer. If you remove it without care, you can slice right throw the growth ring. To remove the rest of the inner bark, I scraped with a knife perpindicular to the wood. You can also opt to leave it on to give the bow a camoflage appearance.
 Once you are at one growth ring, you can layout your bow. The first step is to draw a center line for you bow. With very straight wood, you can just draw a line down the middle of your bow. That is what I did with my first bow. This time, my wood is not at all straight. In fact, if you look at the picture to the left, you can how I laid out my bow. It goes diagonally from bottom right to top left. This is because I had to follow the grain of the wood. If I didn't the bow could break.
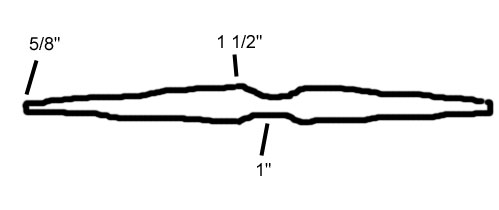
Once you have the center line, you can use it as your guide for drawing in the outline of your bow. As far as demensions go, I made this bow 66" long. I drew a 4" long handle in the middle. You can see in the last diagram the measurements of width for different sections of the bow. This is just the way I do it. There are many different measurements and layouts that one can use.
In the next Bowmaking post, I'll give an update of the status of my bow. Stay tuned.


5 comments:
Pinger,
The stave you have cleared, where'd it come from? I recognize the bar-on stave, but what about the one you cleared the growth ring?
Unanimous
Co-Founder
Skilin' Tha Most
Correction
"bar-on" = 'bark-on'
Those two staves were once one stave that I split on my own last year. Those two were split from the even bigger one in Muncie. The one that still has bark is pretty narrow at one end because of the diagonal grain. I should still be able to get a shorter bow out of it.
cool stuff.
keep them coming.
I got to shoot the bow once. it was sweet.
Great post thankyou
Post a Comment