I finally got my chickens yesterday. I picked up 8 young hens from a person I contacted via craigslist. They were $12 each which is the best deal I found. Most ads I saw priced them at $15-20. Before I get ahead of myself, let's talk about the run.
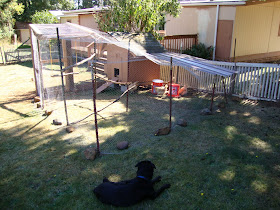
I wanted at least part of the run to be tall enough for me to walk around in so I decided to build a ~6 ft tall door. I sunk two posts I found and then built a door with some 2x4s I bought.
Next I pounded in metal posts I found. They were various heights so it was interesting to figure out the best arrangement for them. Basically the height of the run got shorter the further from the door. There were even a few really short ones that I used to support a metal roof piece I found. This will provide some shade and shelter from the rain.
I added a few more 2x4s on top of the door posts and to the first set of metal posts to make the run a little more solid. I ran the chicken wire out 6-12 inches on the ground and laid rocks on top to prevent the dog from digging under and murdering the ladies. I may try to make this a little more presentable in the future. I'm thinking about putting soil on top and planting something the chickens will eat.
The extra height allowed me to add in some roosts at various heights and a rope swing. I'm hoping these things will keep them entertained. I haven't seen them use them yet though. I also noticed tonight that at least some of them weren't using the roosts in the coop so maybe they just don't want to roost.
Here are the chickens minutes after arriving. They immediately went for the feed and then a dust bath. Also notice Ace casing the joint.
The chickens scratching and bathing. I believe I have 5 Rhode Island Reds and 3 Buff Orpingtons. I made my own feeder and waterer to save money. I think they will last awhile without need of a refill. In the future I would like to hook up a rain catchment system to supply the water.
I think these are Buff Orpingtons, "Buff" being their color.
When I woke up this morning there was one egg in the nesting box. After work there were three more. You can see that they are different sizes, shapes and colors. I think these chickens are 5-6 months old and are just starting to lay. Some may not be laying yet. I ate the eggs tonight and they were tasty. The yolks were very dark yellow.
The only issue so far is that it looks like I underestimated the size of chicken poo. The poo isn't falling through the screen on my droppings boxes. I think I will buy a screen with a larger mesh size. Otherwise it defeats the purpose.
BONUS PIC - I noticed this kind creature praying for my chickens. I haven't seen one of these guys since I was a kid. Good vibes!
"You know, like numchuck skills, bow hunting skills, computer hacking skills. Girls only want boyfriends who have great skills."
--Napolean Dynamite
The main purpose of this blog is for me to document and share my practicing of skills. While, I won't be practicing numchuck skills or computer hacking skills, I am practicing bowhunting skills and a slew of other survival skills. I may have posts about other things as well though.
Sunday, September 27, 2009
Tuesday, September 15, 2009
Chicken Coop Conversion
I've been working on converting my doghouse into a chicken coop for many weeks now. Last week I finally finished. It was a challenge to customize an already existing structure and to use as many free materials as I could.
I started by elevating the structure on cinder blocks and wood I scavenged. I did this because it is my understanding that chickens like to roost off the ground and almost every coop I've seen is elevated. Raising the coop without assistance was a chore because the doghouse was pretty heavy. I used a combination of levering and my car's jack to elevate it into place. It was also a pain to get all four corners level since it is on a slight hill.
I next cut out the side to add on a nesting box. This provided a few benefits. First it made the overall size of the coop larger to comfortably accommodate more birds. Second it will allow me to gather eggs from outside the coop and soon to be added run.
The nesting box was completed with wood that I already had. The two sides were recycled from the pieces I cut from the doghouse wall. The box is very large compared to the recommended size I read and should have more than enough room for the six chickens I plan to buy.
The part that took me the most time was the removable droppings boxes. It took some time and money to figure out how to make them work. I'm satisfied with the final product. The benefits of my design are as follows. First, the screens are removable so I can clean the droppings out of the boxes. Second, the boxes are sized so I can remove them from the coop for easier cleaning. The final product is a floor that is easy to clean and prevents the chickens from walking around in their own poop.
You can see the box on the left has the removable screen on it and the one on the right doesn't.
I added a removable piece to make the doorway chicken-sized. It should help retain chicken body heat in the winter, prevent drafts and make the chickens feel more secure. I screwed in a wood block that swivels to lock the piece in place. I then added a ramp to assist the birds in entering the coop. I may need to add some more rungs.
Luckily the roof of the doghouse extended many inches to cover the nesting box add-on so I didn't have to waterproof it.
Inside I added two roosts cut to size from some dead branches I found in the forest. They are mounted using clothes-hanger-rod hardware in case I ever need to remove them or replace them. I also rounded the edges of the 2x4 rafters with a rasp to make them comfortable for roosting. Finally, I found the pretty pink paint that was left in the shed and coated the new parts.
She ain't the prettiest, but I think she'll work great. I'm currently working on the run. At first I thought of letting the chicken roam the whole fenced in yard, but I've seen too many hawks and owls around, not to mention all the predators I haven't seen and my friend's dog who likes to destroy things of mine.
Wednesday, September 02, 2009
Glass Buttes Trip - Fall 2009
Last weekend we made another trip to Glass Buttes. This time we had a bigger crew. In total there were ten of us in three vehicles, but the five crammed into the Honda were off on their own once we got there. We saw them once a few hours before we left to go home on Sunday.
The crew I hung with is pictured below: Shawn, Andrew K, Shaun, Andrew P and me. I guess I should have been named "Sean" to keep the pattern going. :) In the background you can see Big Glass Butte.
When not cooking various non-refrigerated pork products, we spent most of our time on my favourite hilltop gathering and breaking rock.
I love this hilltop because it offers modest-sized surface rocks for easy picking or mystery-sized underground rock for some extra effort. It's odd because as you walk around it's mostly grasses, shrubs, and dirt but then every 60 yards there is a stream of rocks running down the hill.
Sometimes when you dig you get a nice reward for not too much work. Shawn found this monolith partially excavated. After some work he pulled out a big'n. Sometimes you dig and hit just the tip of an iceberg and work on it for hours with nothing to show for it.
Here Shaun teaches his friend Shawn the principles of flintknapping.
Andrew K studying his rock to decide where to make the first strike.
Saturday afternoon The Andes ("Hot Fuzz" reference) and I drove to another location where a different type of rock was available. Dacite is like obsidian but a little harder and less brittle. We collected a lot of it. We collected enough to make my car bottom out trying to get from the quarry to the main dirt road. We had to unload the rock to get my car out.
In the picture below, Andrew K and I reduce the big rocks down to usable pieces. This reduced the overall weight of the load while, in theory, still allowing enough material for a nice finished product.
In then end we each got enough rock to last for awhile. I'm excited to get to work on the dacite. There is just so much to do at the new place especially since hunting season started last Friday.
These pictures are from my new camera. Tonight I should have internet access at home. So now I have no more excuses for not posting more often.